

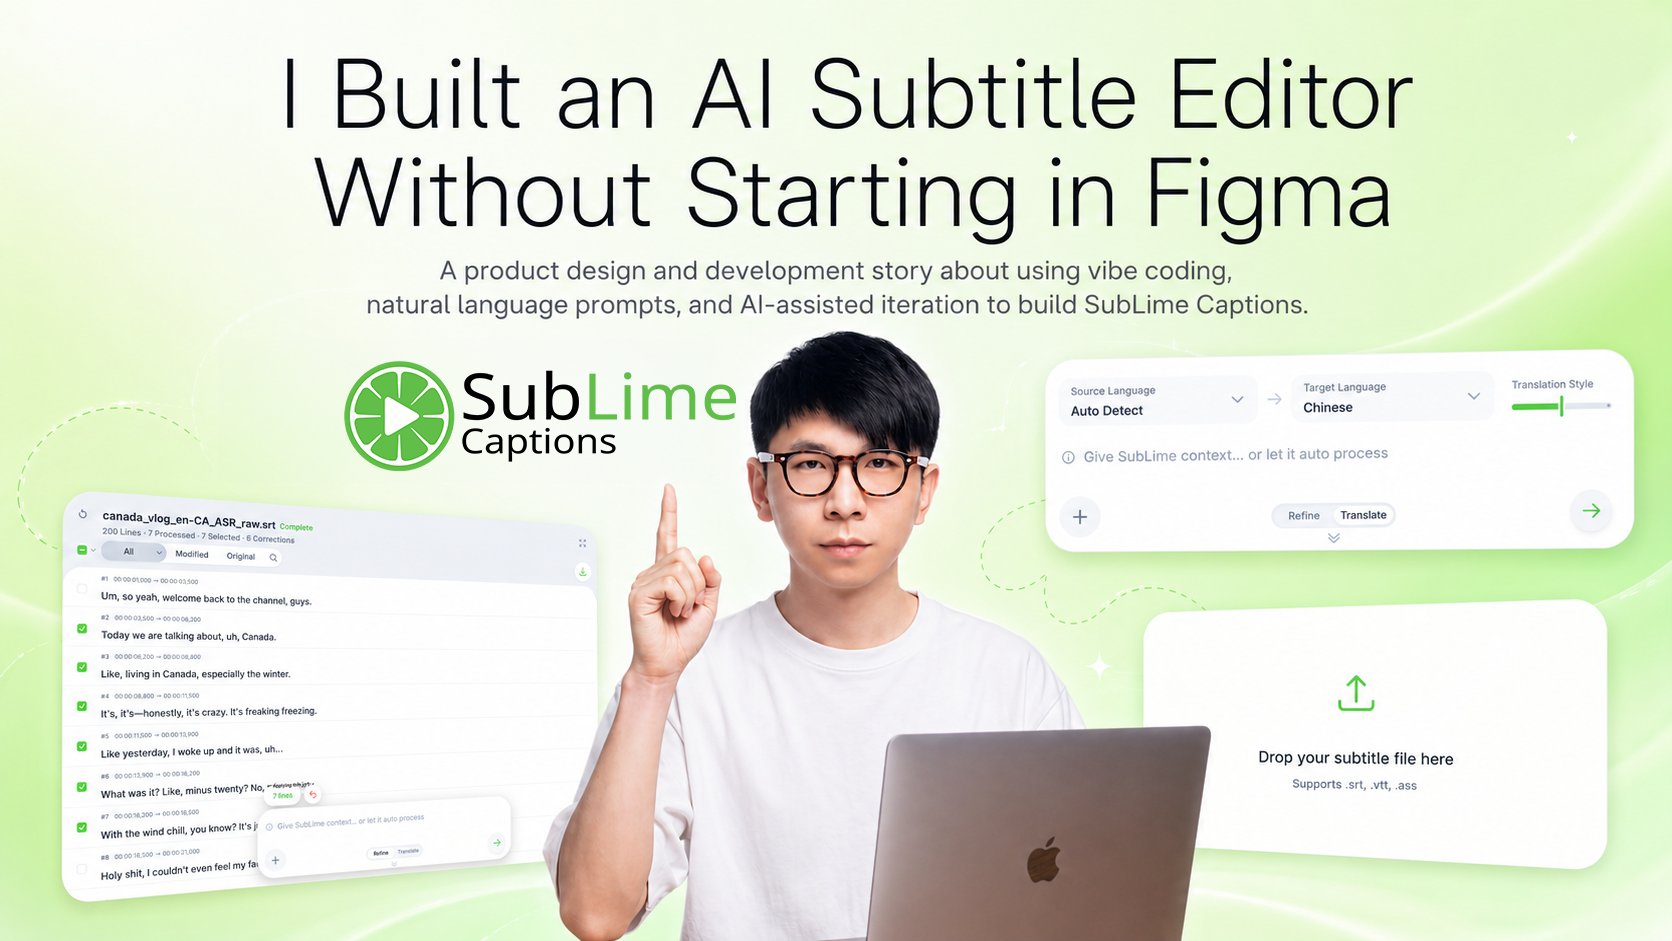
Product Design Review of SubLime Captions
SubLime Captions is a vibe coding project that I designed and developed on my own.
It is a web-based tool that uses AI to automatically proofread and translate subtitle files. It supports common subtitle formats, including:.srt, .vtt, .ass.
The problem it tries to solve is simple:
Help video creators save time on subtitle proofreading and translation.
If subtitle proofreading and translation are done manually, creators usually have to check the file line by line, or copy each line into a translation tool and paste the result back. This takes a lot of time and is very easy to get wrong during repetitive work.
SubLime Captions is designed to hand this process over to AI, so creators do not have to spend their time on repetitive and mechanical subtitle tasks.
1. Starting from a Real Pain Point: Why Video Creators Need an AI Subtitle Tool
1.1 The Pain Point: Subtitle Proofreading and Translation Take Too Much Time
The initial idea for this project came from a real problem I kept hearing about while helping a YouTuber friend shoot videos in 2024 and 2025.
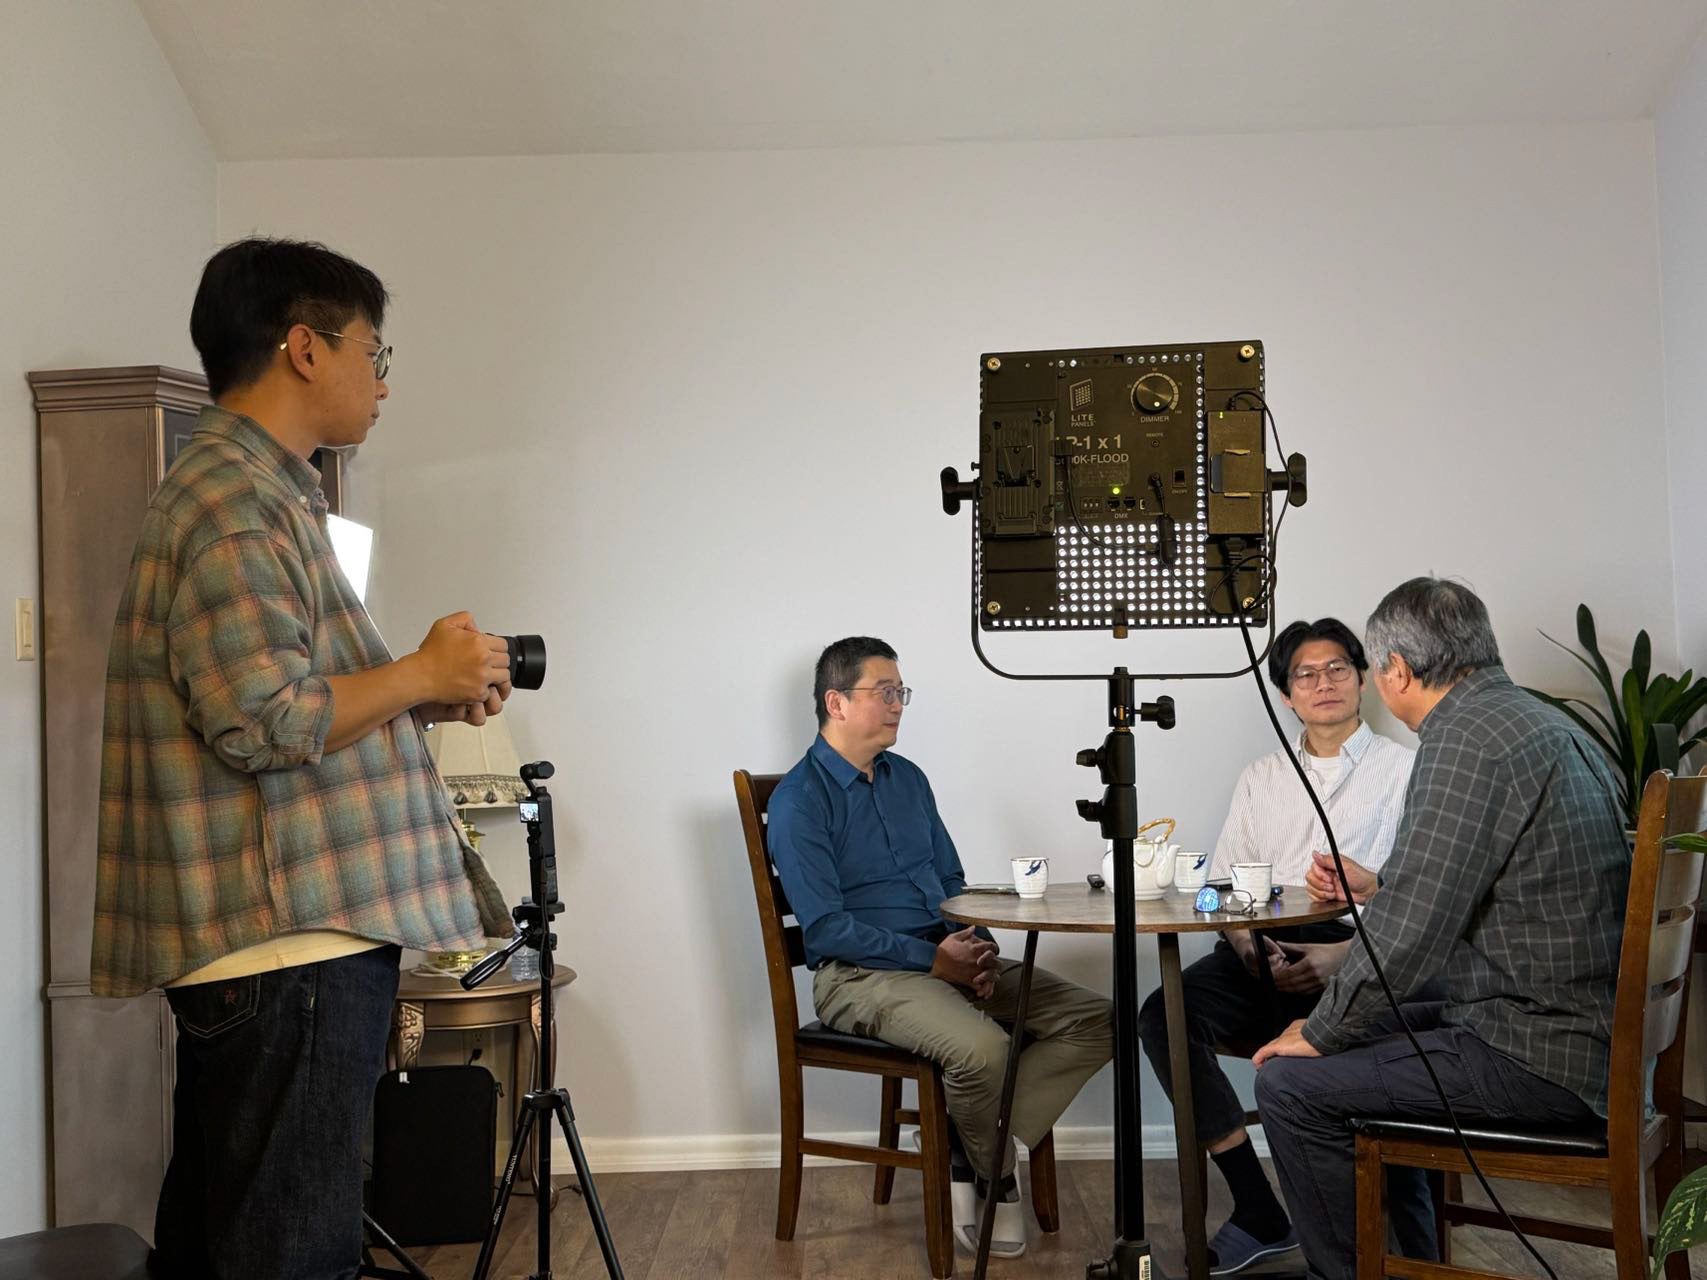
There was one part of his workflow that took a lot of time:
subtitle proofreading and subtitle translation.
He often shoots interview-style documentary videos. A typical video is around 15 to 20 minutes long, with 800 to more than 1,000 subtitle lines.
These subtitles are usually generated by automatic speech recognition, so they often contain issues such as:
· Typos
· Incorrect names, locations, and proper nouns
· Messy punctuation
· Fiiller words, pauses, stutters, and repeated words that have not been cleaned up
These errors usually do not follow a fixed pattern, so they are hard to batch-process with simple rules.
What makes it more difficult is that tools like ChatGPT and Gemini can process text, but they still have limits on document length and input size. So it is not always possible to paste an entire subtitle file into the tool and ask it to proofread and translate everything in one go.
In the end, the workflow becomes very basic but also very common:
· Open the subtitle file manually, check it line by line, and edit the errors one by one.
· If translation is needed, copy each line into a translation tool, then copy the translated result back.
For one video, this can easily take a full day.
So my thinking at the time was simple:
If I could build a tool that sends subtitle lines to AI one by one, then writes the results back automatically, it should save a lot of time.
1.2 Product Positioning: An AI Subtitle Workspace for Video Creators
When I started thinking about this subtitle processing product, its core positioning was:
A web-based tool that uses AI to automatically proofread and translate subtitles.
It is not a complex professional subtitle editor, and it is not just a translation tool.
It is closer to an AI workspace for video creators. It focuses on solving these problems:
· automatically finding typos in subtitles
· correcting recognition errors based on context
· using background information provided by the user to improve judgment
· automatically translating subtitles
· allowing users to edit manually
· supporting before-and-after comparison
· Supporting batch selection and batch actions
· Allowing users to download the processed subtitle file
I had a clear design direction from the beginning:
Make it work more like ChatGPT or Gemini, where users can tell the AI what they want in one sentence and get the expected result.
Many users are already familiar with this kind of AI interaction pattern. So when they see an instruction input box similar to an AI chat box, they naturally understand:
I can enter background information, requirements, and processing instructions here, and see the results in the area above the input box.
2. From an AI Studio Demo to a Productized Tool: A Vibe Coding-Driven Design and Development Process
2.1 Quickly Validating the Idea with Google AI Studio
At that time, I had just started using Google AI Studio and was trying to build some small web apps with it.
So the first version of this project was a demo created with the Build feature in Google AI Studio.
I entered a prompt roughly like this:
I am a video creator. When proofreading subtitles, I often run into typos and errors generated by automatic speech recognition. These errors happen because the speech recognition software does not understand the interviewee’s background, the interview context, or the overall situation. I want to build a web app where users can upload subtitle files and enter some background information, such as the interviewee’s profile, time, location, and relevant proper nouns. Then the app should use AI to analyze and correct errors in the subtitles.
After receiving the prompt, Google AI Studio ran for a few minutes and generated a web app.
The first demo included:
· A subtitle upload area
· A Context Information Forms section
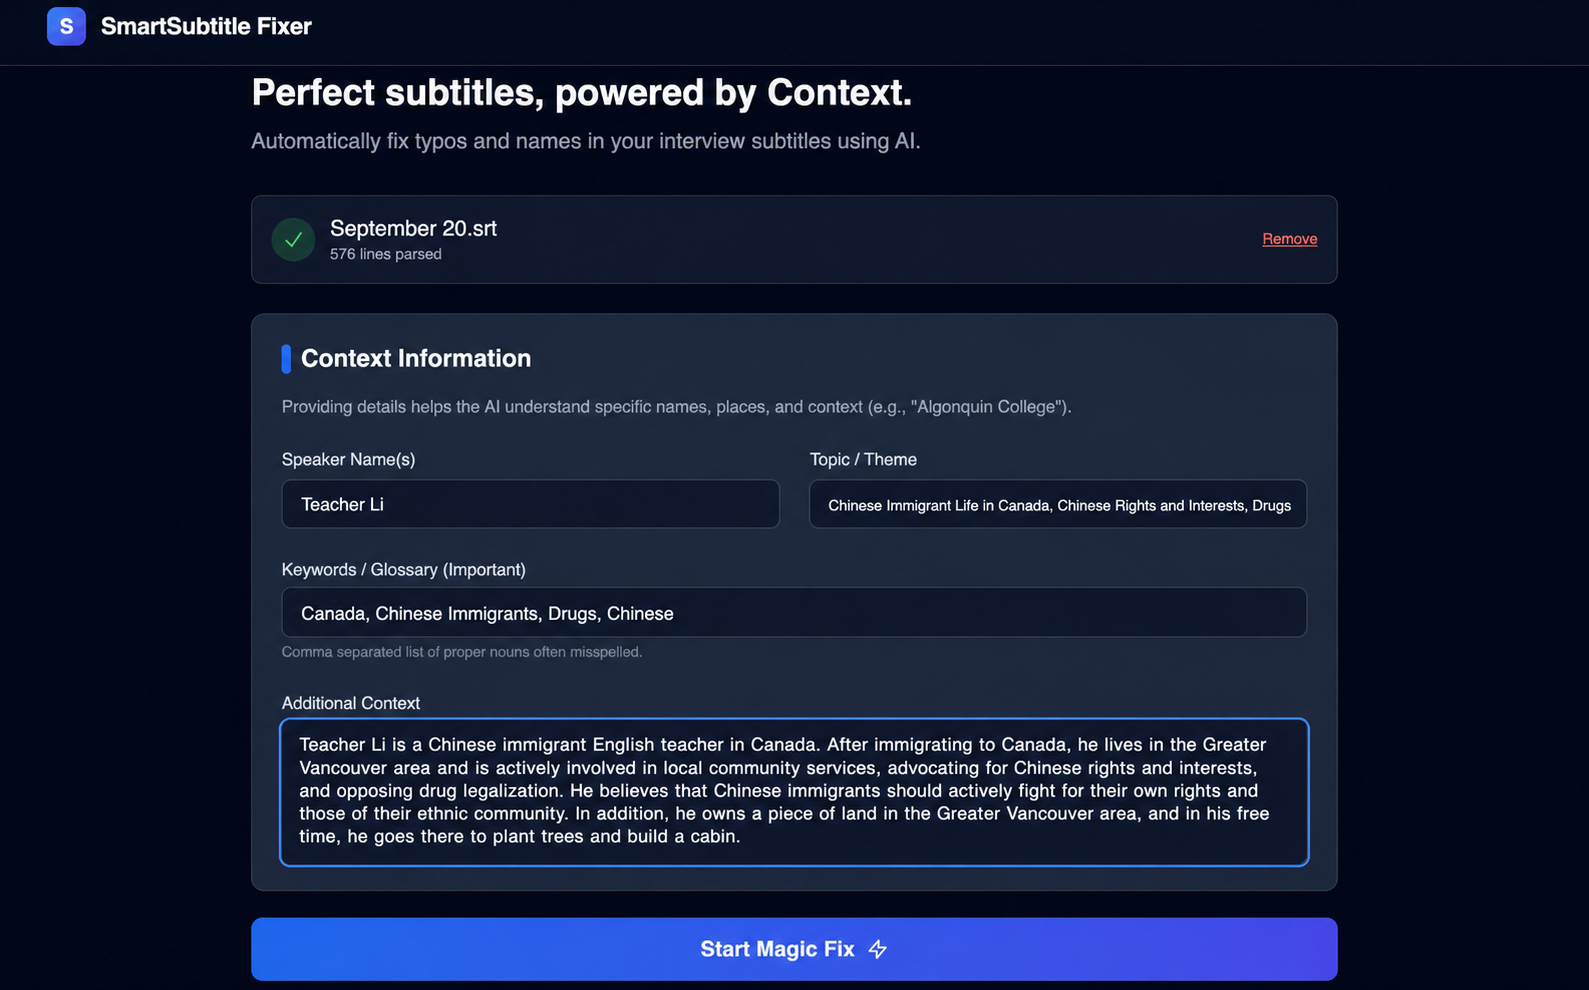
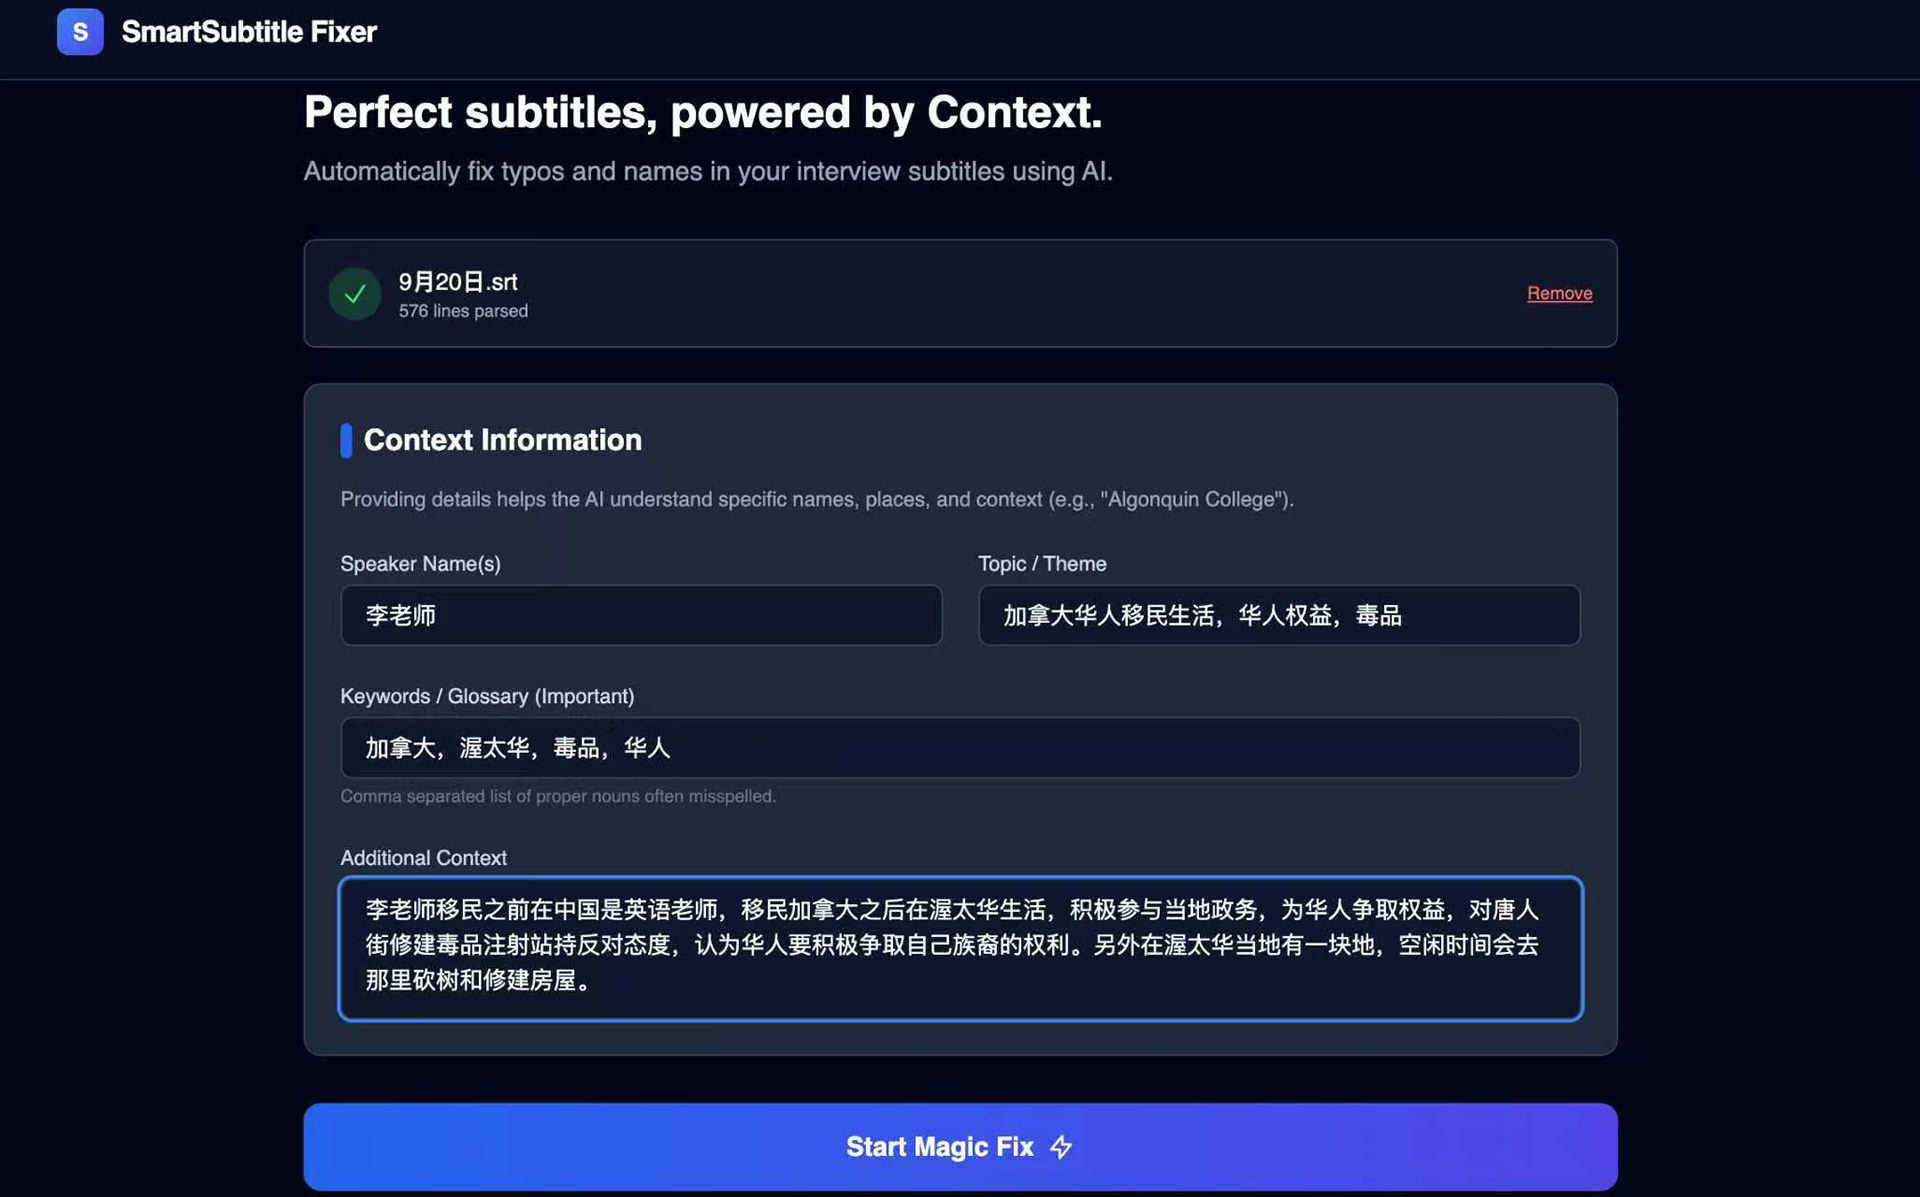
· A subtitle processing result area
It also required users to manually enter some video-related information, such as:
· Speaker Names
· Topic/Theme
· Keywords/terms
· Additional Context
I tested it with one subtitle of my friend’s previous interview video. I uploaded the subtitle file and filled in information such as the main character, topic, keywords and background.
The demo then called the Gemini API to process the subtitles, and the result was surprisingly good.
This step basically proved that the idea was feasible.
2.2 From a “Usable Demo” to a “Good Product”
However, this demo was generated directly from a prompt, so the feature set was still very basic. It could only cover the most essential use cases and was still far from being truly easy to use.
What I did next was essentially a full product redesign of the demo, including:
· Redesigning the UI
· Redesigning the interactions
· Redesigning the subtitle processing flow
· Adding subtitle translation
· Adding mode switching between subtitle proofreading and subtitle translation
· Upgrading the large language model capabilities
The main vibe coding tools I used later were Antigravity and Codex. Figma was used as a supporting tool, mainly for drawing simple diagrams rather than complete UI mockups or interaction prototypes.

2.3 How Vibe Coding Changed My Design and Development Process
The design process for SubLime Captions was quite different from a traditional product design workflow.
A typical workflow usually looks like this:
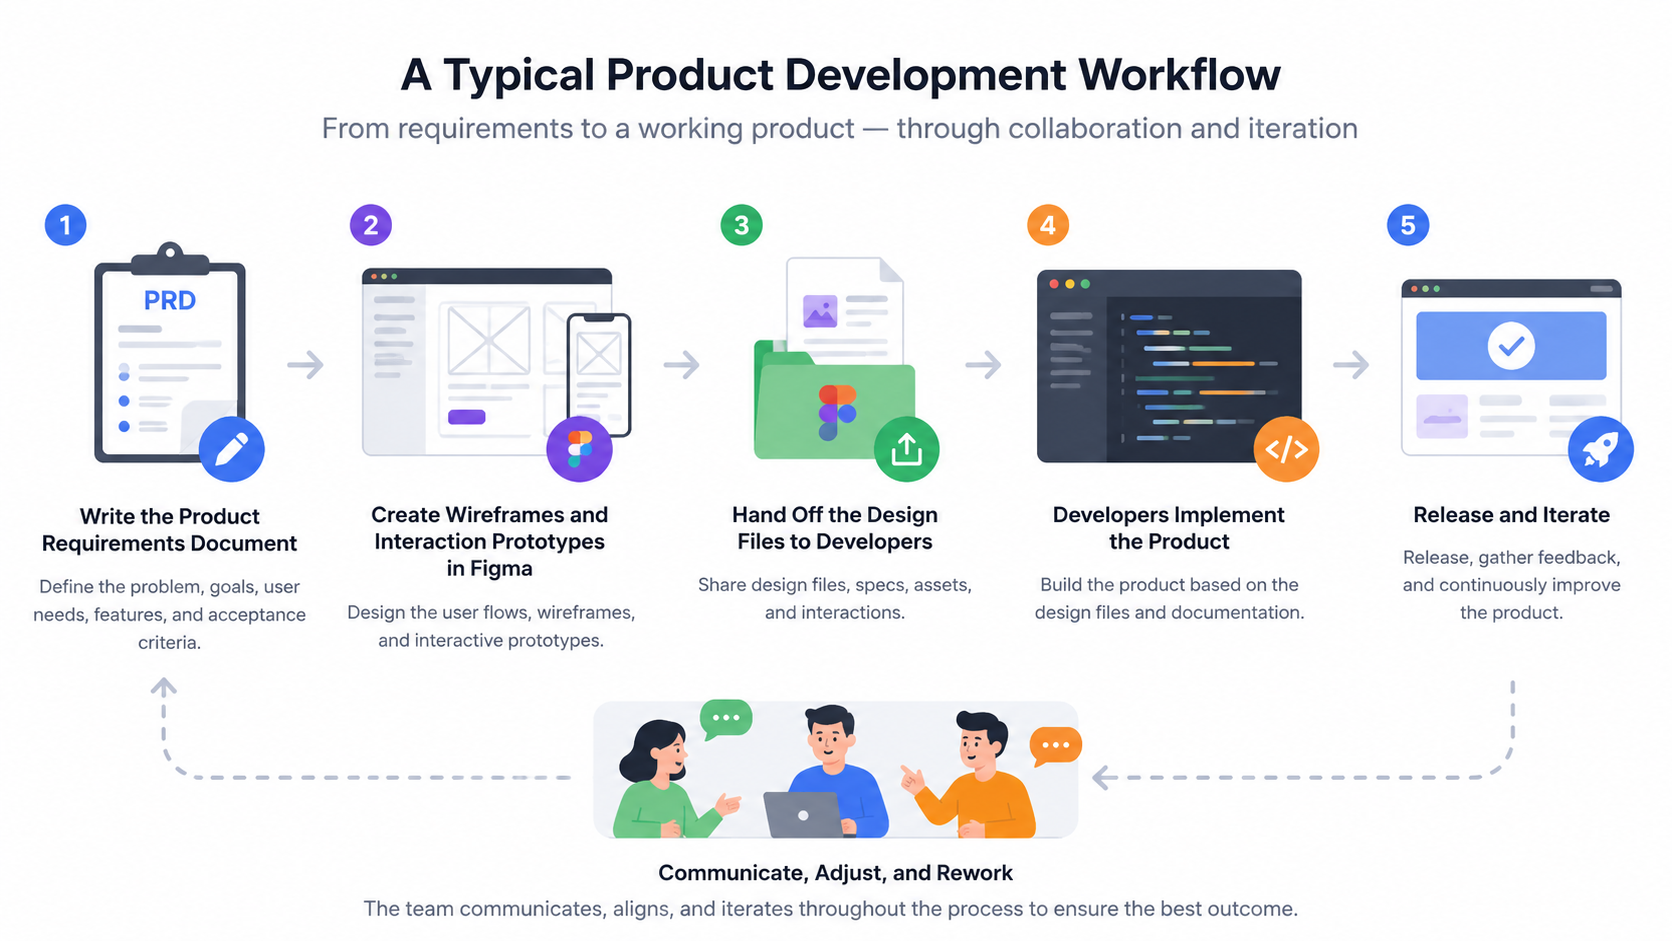
But for this project, I did not fully follow that process.
I did not start by creating complete UI mockups or interaction prototypes in Figma. Instead, I described interaction requirements directly to AI in natural language and let it generate the corresponding implementation.
For example, when I wanted to add a view switcher next to the filter controls, I would simply tell AI:
Add a dropdown menu to the right side of the “All” button. The dropdown should include two view options: Comparison View and Immersive Preview Mode. When users select an option, the subtitle editor should switch to the corresponding display mode.
After AI understood the requirement, it generated the code and updated the UI at the same time.
From there, I could continue refining the experience through natural language:
· Move this button slightly to the right.
· Change the button background to light gray and use the theme color on hover.
· When there is content in the input box, change the icon to lime green and add a subtle shadow so it feels slightly lifted.
This workflow feels very different from the traditional process of designing first and developing later.
In the past, many UI and interaction details had to be designed in Figma, documented with state annotations, and then handed off for implementation.
With vibe coding, I can describe ideas directly, let AI build a working version, and then refine the experience based on what I actually see and use.
Many UI decisions in this project were not fully designed before development started. They emerged during development through testing, iteration, and continuous adjustment.
UI Design and Development Started to Merge
The biggest thing I realized during this project was that the boundary between UI design and development is starting to blur.
Before trying vibe coding, I mainly used Figma to design interfaces and prototype interactions. Turning those designs into a working product still required development skills beyond my reach.
With vibe coding, that gap became much smaller.
Many times, I would simply describe an idea directly inside the development environment:
Add a pill button that shows the currently selected subtitle range. When users click it, the selected subtitles should appear one by one at the top of the editor, allowing users to cycle through them.
AI would generate a working version, and I could immediately evaluate the result.
If it did not feel right, I would continue refining it:
· Reduce the height slightly.
· Increase the border radius.
· Make the text color less prominent.
· Add a subtle hover state to indicate interactivity.
The process became a continuous loop:
Design → Build → Preview → Feedback → Refine
Development no longer waits for a complete design handoff, and design decisions no longer need to be fully finalized before implementation begins.
Faster Iteration Through Real Product Feedback
For me, the biggest advantage of vibe coding is speed.
Ideas no longer have to stay in documents or prototypes for long. They can quickly become working features that I can click, test, and evaluate.
In many cases, the workflow becomes:
1. Describe the requirement in natural language.
2. Let AI generate the first version.
3. Test it directly in the product.
4. Continue refining it until it feels right.
The feedback loop becomes much shorter.
This is especially valuable for personal projects because many interaction details are difficult to fully validate in advance. You often need to build them, use them, and experience them firsthand before you know whether they actually work.

Many features in SubLime Captions were shaped through this iterative process, including:
· Auto-hiding and manually expanding the input box
· The rotation animation of the plus button
· Hover and active states of the send button
· View switching in the filter
· The selected subtitle pill button
· The breathing glow around the subtitle editor
· Auto-scrolling during batch selection
None of these interactions were designed perfectly from the beginning. Most of them evolved through repeated testing, usage, and refinement.
The biggest lesson I learned from this project is that the value of vibe coding is not simply that it helps designers generate code.
Its real value is that it allows ideas to become testable product experiences much earlier, making it easier to discover, validate, and refine interactions while building the product itself.
2.4 Simple Diagrams Are Still Useful: From Complete Design Files to Design Intent
Of course, for some ideas that were hard to explain clearly with words, I still used very simple diagrams.
Some of these diagrams were drawn in Figma, but they were not complete design files in the traditional sense. They were more like sketches for AI, or for myself.
For example:
· Roughly where a button should be placed
· Which area a menu should cover after it expands
· The shape and position of a floating layer
These details can sometimes be hard to describe with text alone.
In those cases, a simple wireframe can help AI understand my intent much faster.
That said, this process does not depend entirely on Figma. If the goal is only to express a rough layout, simpler drawing tools can also work. Even a hand-drawn sketch can be enough.
The key is not the tool itself, but whether the design intent can be communicated clearly.
2.5 Natural Language Also Needs Design: How to Describe Requirements Clearly
However, this approach does not mean designers can stop thinking.
On the contrary, if you want AI to produce something close to your expectation, your requirement description needs to be clear.
For example, you should not just say:
Make this button look better.
This is too vague. AI probably will not know what you actually want.
A better description would be:
Change this button to a light gray background and increase the border radius. On hover, change the background to the lime theme color. If there is text in the input box, change the button icon to the theme color and add a subtle shadow so it feels slightly lifted. Keep the animation subtle, with a transition duration of around 0.02 seconds.
This kind of description is much more likely to produce the result you want.
So in vibe coding, natural language becomes a new design tool.
In the past, designers expressed design intent through Figma layers, components, and annotations.
Now, we can also use clear natural language to describe layout, states, interactions, and visual details.
2.6 Takeaway: AI Can Speed Up Implementation, but Design Judgment Still Belongs to Humans
So SubLime Captions is not a traditional “design first, develop later” project.
It is more like a process where design and development keep moving forward together.
I start with a general product direction, then describe requirements to AI in natural language inside vibe coding tools. AI implements the feature, and I continue adjusting it based on the actual result.
In this process, Figma is not useless, but its role has changed.
It is no longer always the tool for producing complete UI designs. Instead, it becomes more of a sketching tool for expressing design intent.
This way of working makes the whole design and development process faster. It is also more suitable for personal projects, small teams, and early-stage product validation.
Of course, it also requires the product designer to have a clear understanding of interaction design, visual design, and user experience.
AI can help you implement features faster, but whether a feature is actually useful, and whether it should be designed this way, still needs to be judged by a human.
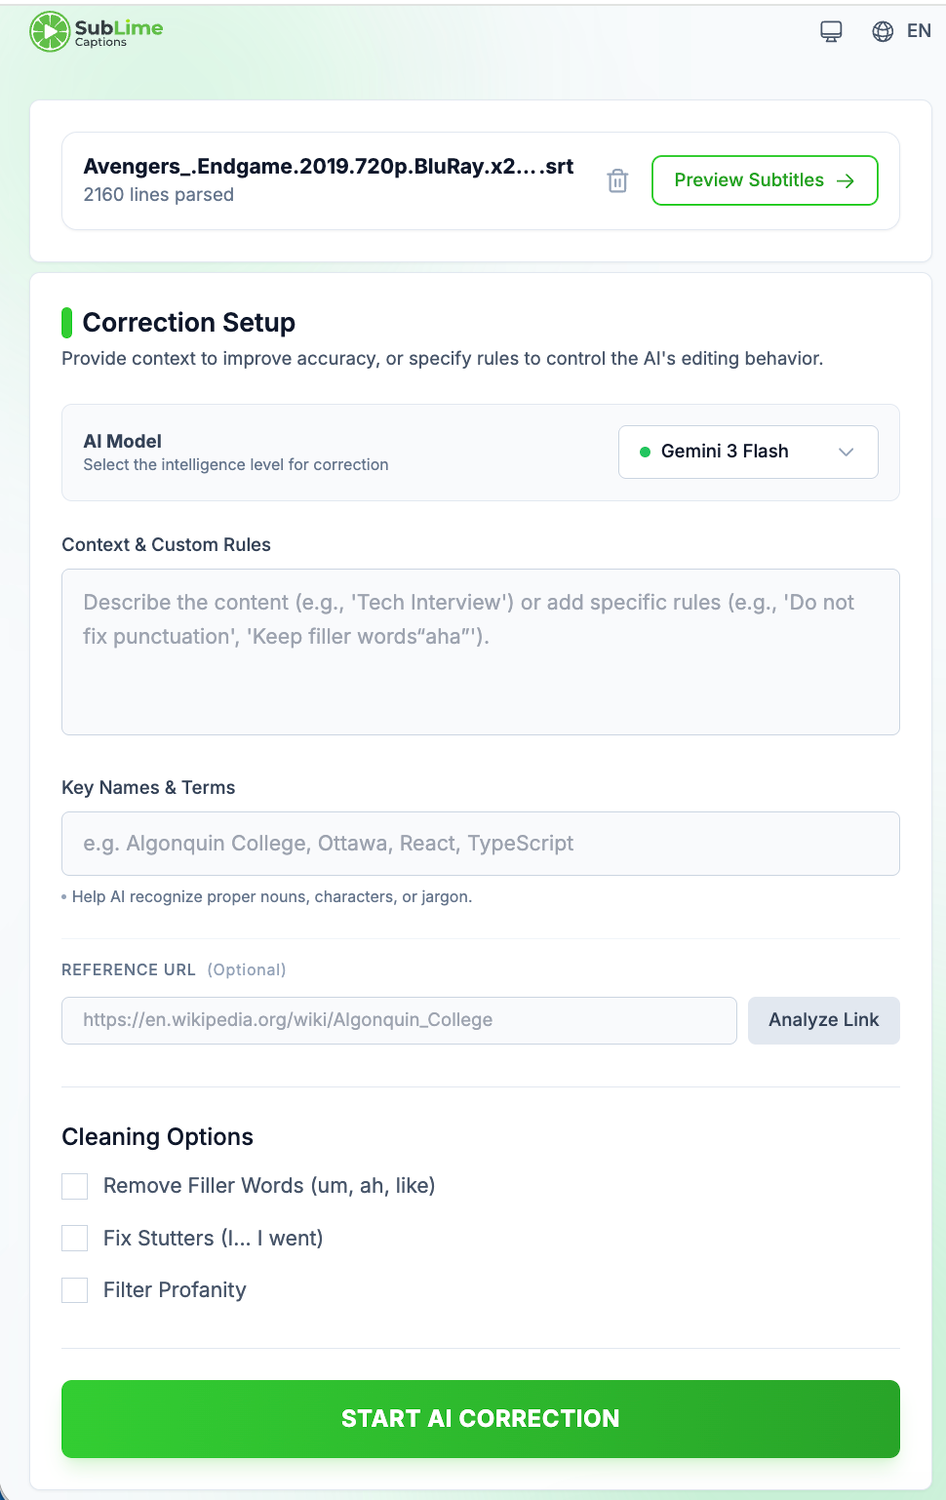
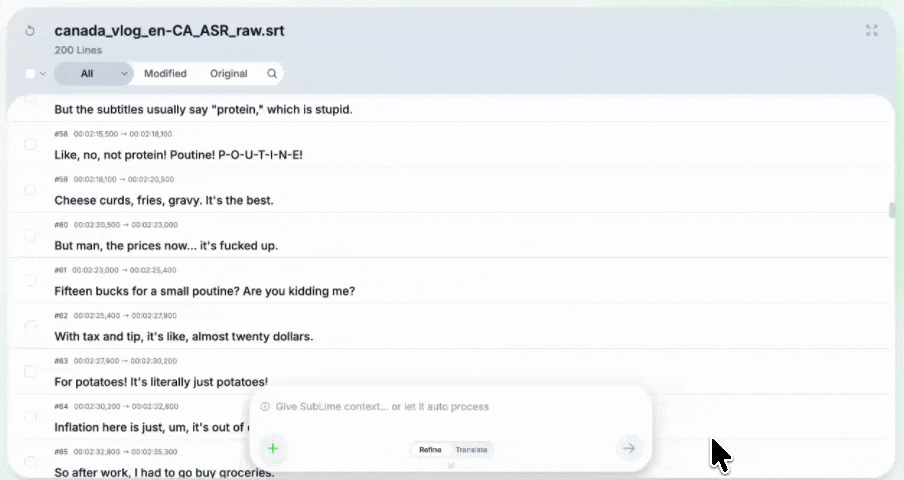
3. Core Capability Design: Rebuilding the Workflow Around Subtitle Proofreading and Translation
SubLime Captions has two core features:
· AI-powered subtitle proofreading
· Subtitle translation
3.1 AI-Powered Subtitle Proofreading: Let AI Find and Fix Errors
The proofreading feature mainly handles these types of issues:
· Typos
· Speech recognition errors
· Incorrect proper nouns
· Punctuation cleanup
· Filler words, pauses, stutters, and profanity filtering
· Deciding whether a subtitle line needs to be changed based on context
Users can also provide extra context, such as:
· When the video was recorded
· Where it happened
· Background information about the people in the video
· The interview topic
· Specific proper nouns
· Words or expressions they want to keep or replace
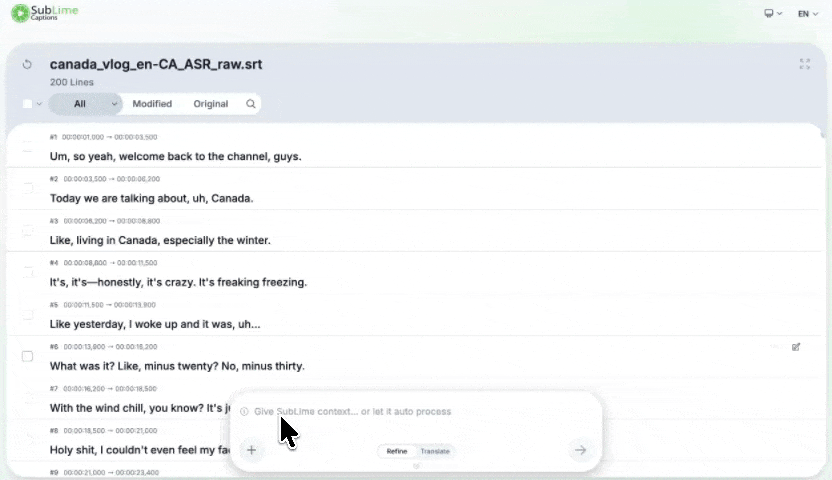
Even if the user does not enter any custom instruction, the AI can still understand the subtitle context and produce a reasonably good proofreading result.
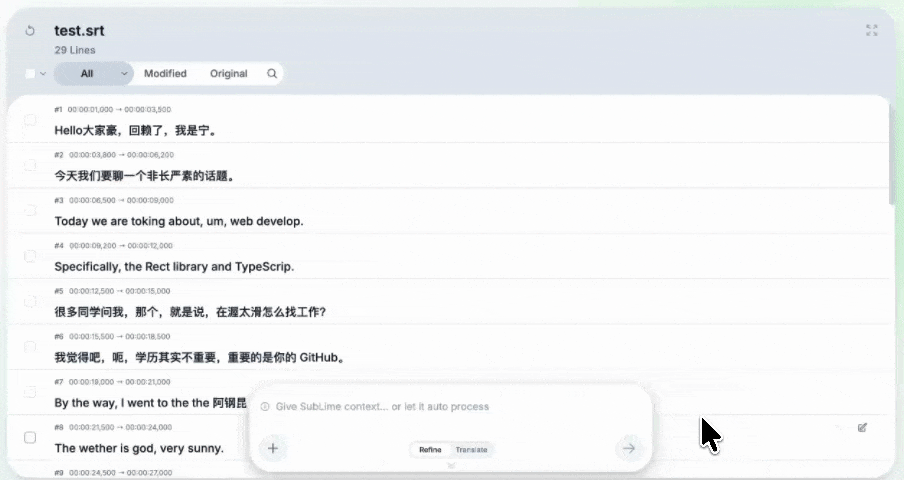
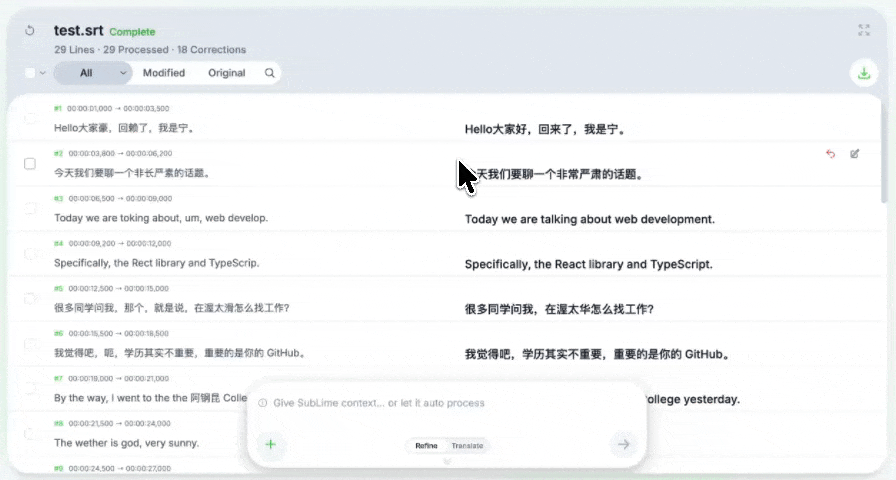
3.2 Subtitle Translation: Generate More Natural Subtitles in Context
The translation mode supports:
· Auto-detecting the source language
· Selecting a target language
· Setting the translation style
· Entering custom translation instructions
When translating subtitles, users can specify things like:
· How a certain word should always be translated
· Whether the tone should be more formal or more casual
· Whether the translation should use localized expressions
· Whether certain proper nouns should be kept unchanged
The translation feature is not meant to translate word by word.
The goal is to create subtitles that feel natural in the viewing context.
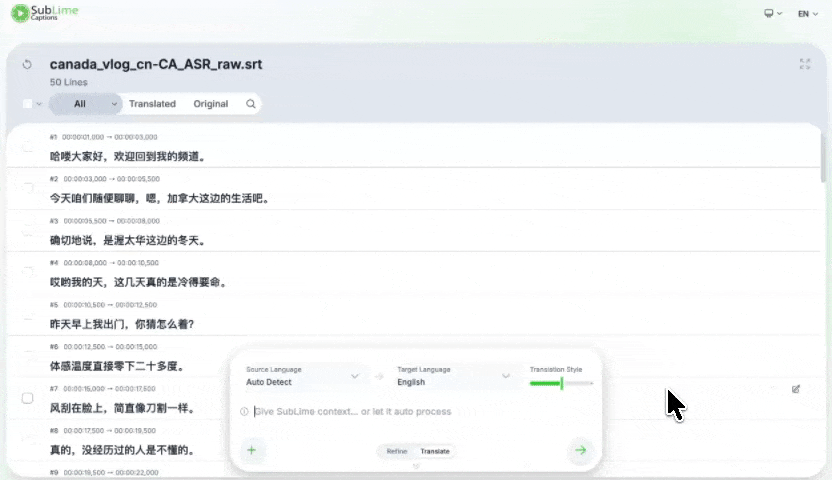
3.3 Translation Settings: Language Detection, Target Language, and Style Control
When the user switches to subtitle translation mode, a translation settings panel appears above the instruction input box.
This panel includes three parts:
· Source language selection
· Target language selection
· Translation style slider
3.3.1 Source Language: Auto-Detection and Manual Selection
The source language can be detected automatically. Users can also select it manually.
I kept auto-detection because some videos may include more than one language.
For example, a Chinese video may include English words, or an English interview may include names of people and places from other languages.
3.3.2 Target Language Selection
The target language menu supports more than ten common languages.
This makes it easier for users to translate subtitles for audiences in different regions.
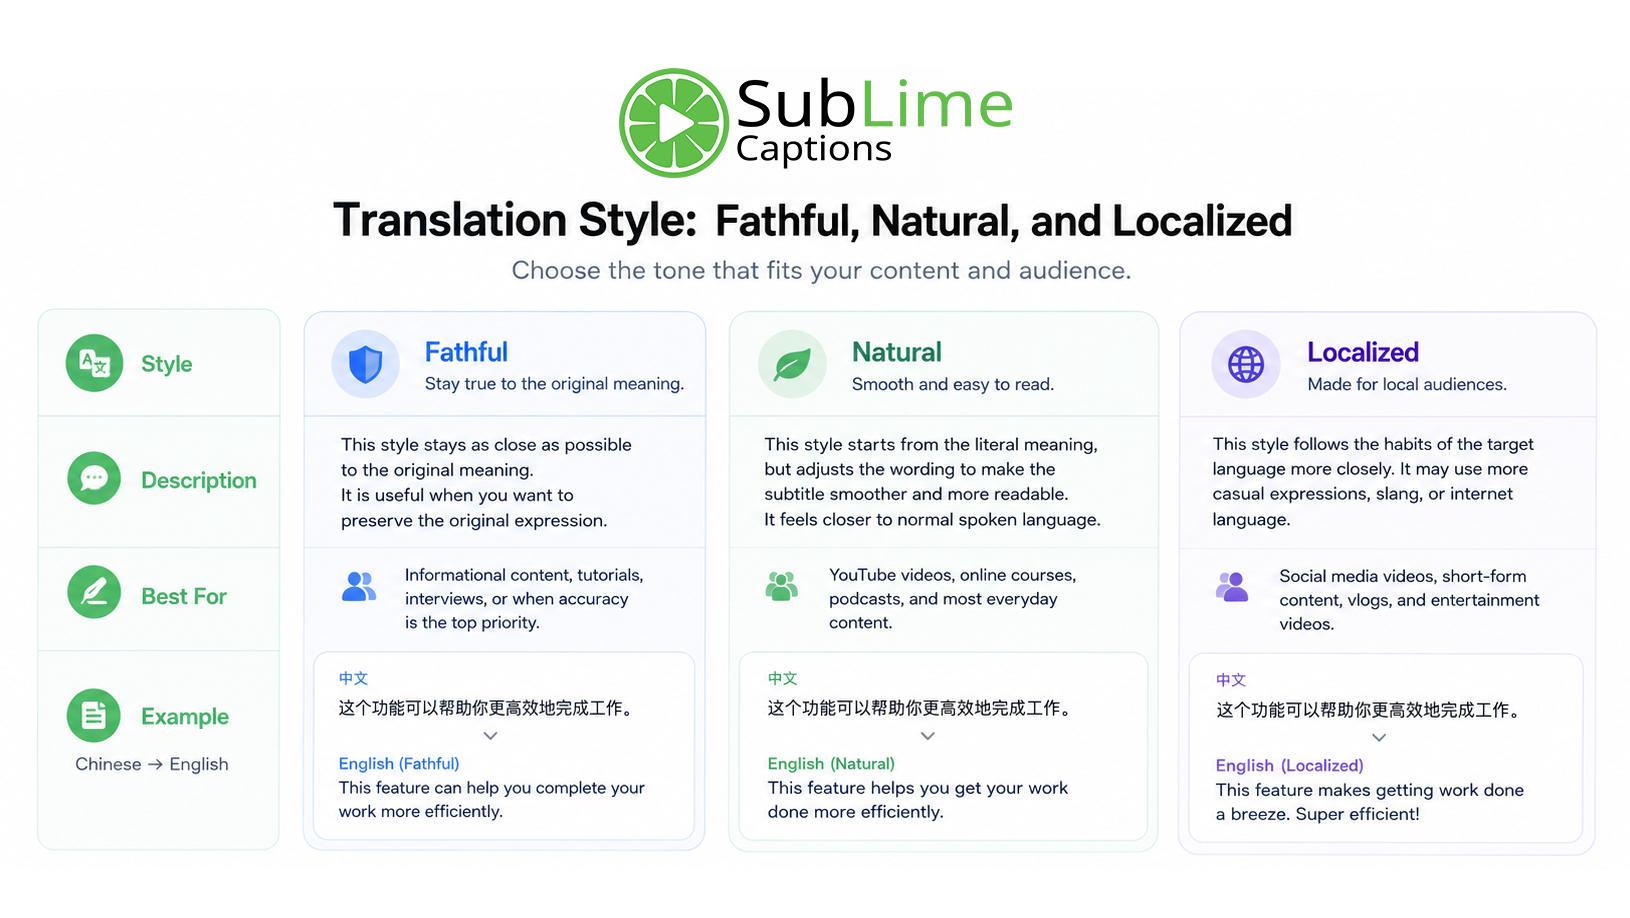
3.3.3 Translation Style: Fathful, Natural, and Localized
The translation style has three levels:
3.4 Mode Switching: Supporting Different Subtitle Workflows
Users can switch between Subtitle proofreading and Subtitle translation freely.
This is important because different creators have different workflows.
Some users may want to proofread the original subtitles first, and then translate them.
Others may want to translate first, then review and adjust the translated subtitles.
The product should not force every user into the same fixed process.
Instead, it should support the way they already work.
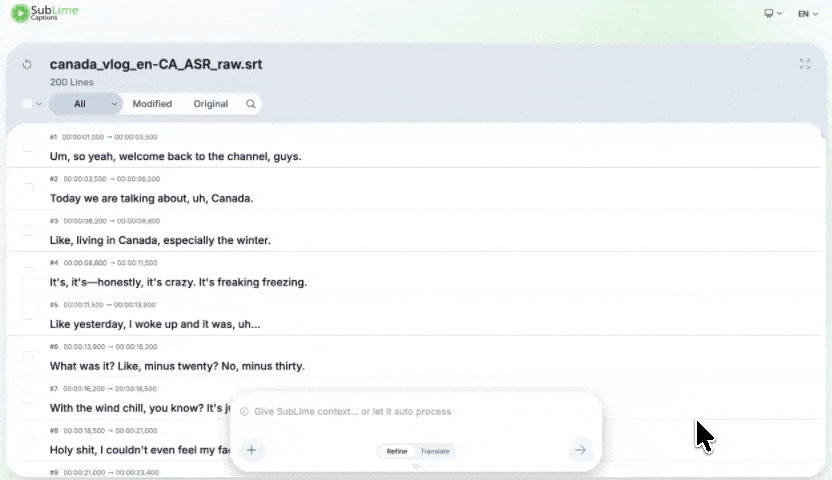
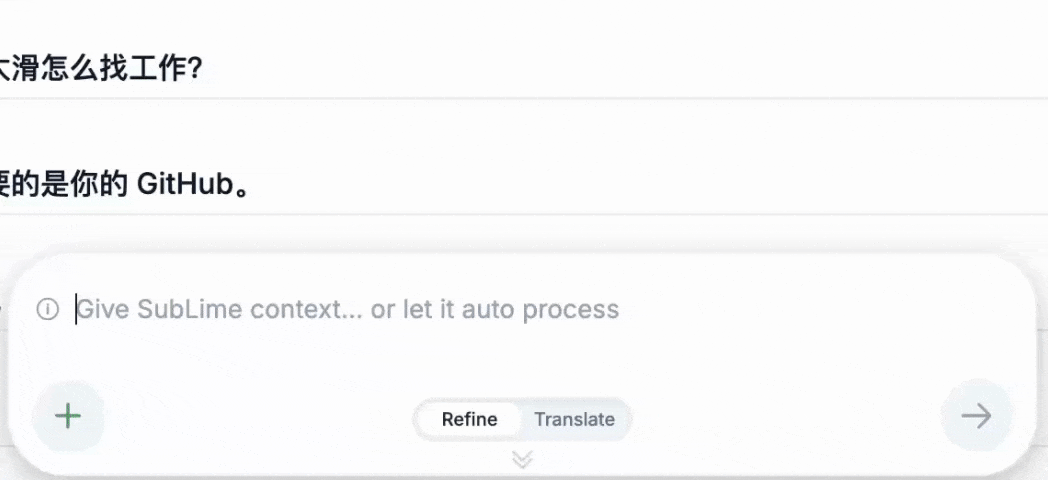
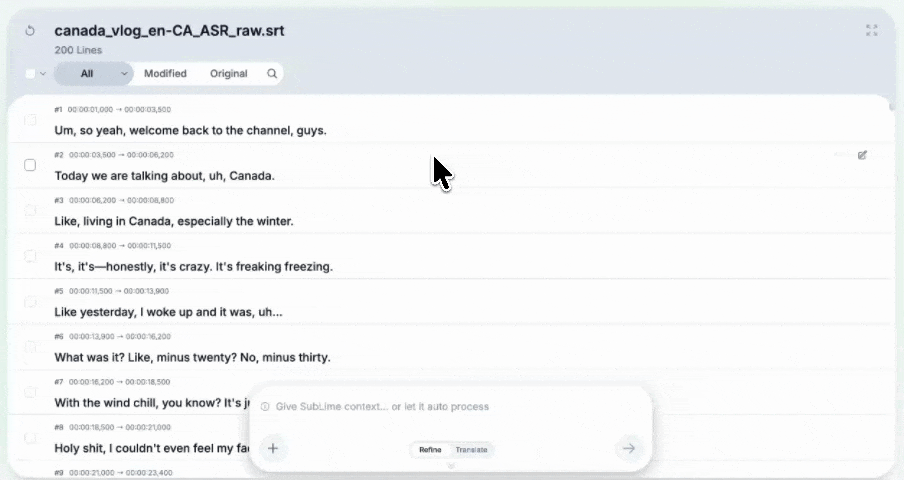
4. AI Instruction Input Box: Replacing Complex Forms with Natural Language Input
4.1 Why I Merged Multiple Form Fields Into One AI Input Box
The instruction input box is one of the most important interaction points in the product.
In the original demo, users had to fill in several separate form fields.
Later, I merged them into one input box, similar to the input experience in AI products.
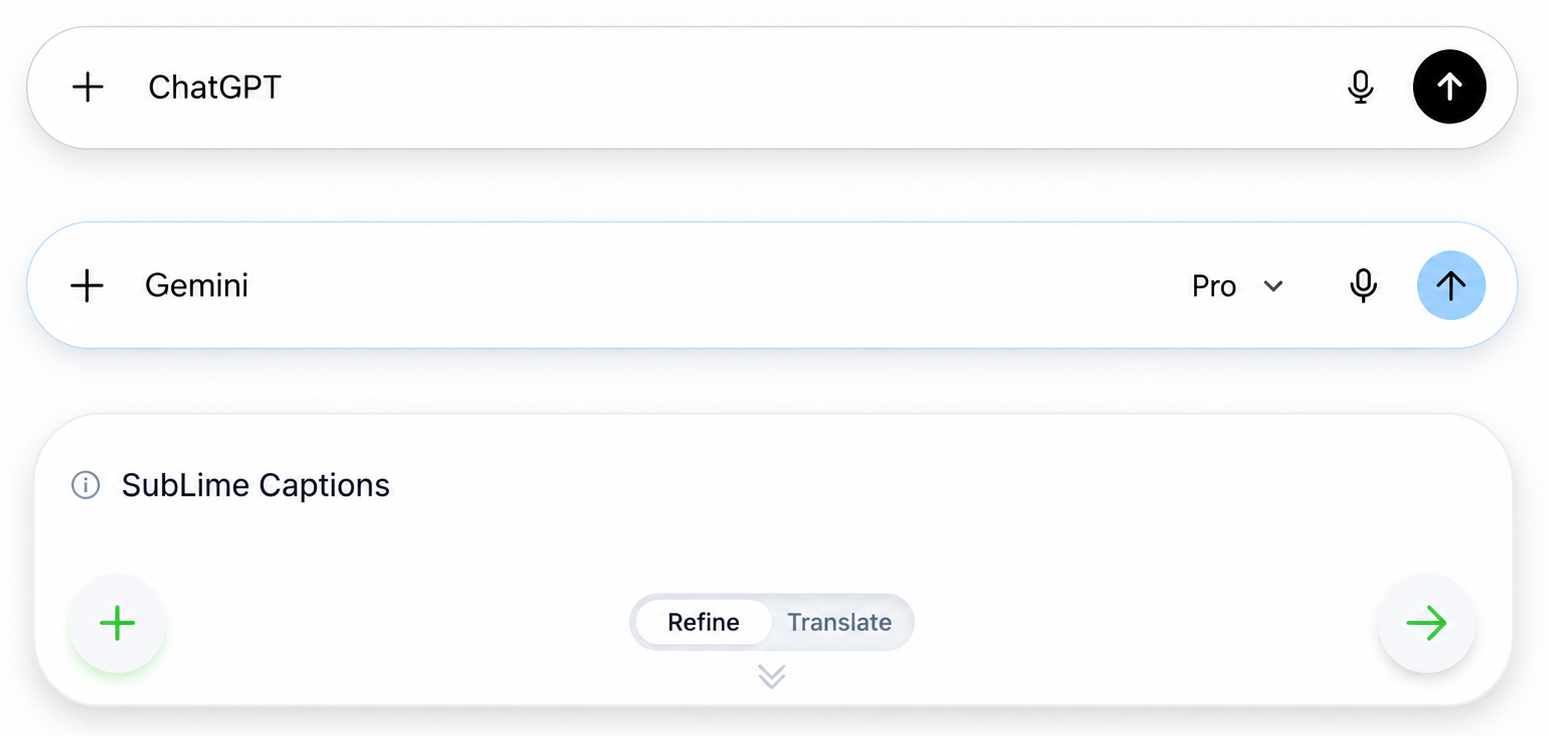
There were a few reasons behind this decision:
· Users are already familiar with this type of input.
· They do not need to think about which sentence should go into which form field.
· AI can understand context, terms, and instructions from natural language.
· The overall interface becomes cleaner.
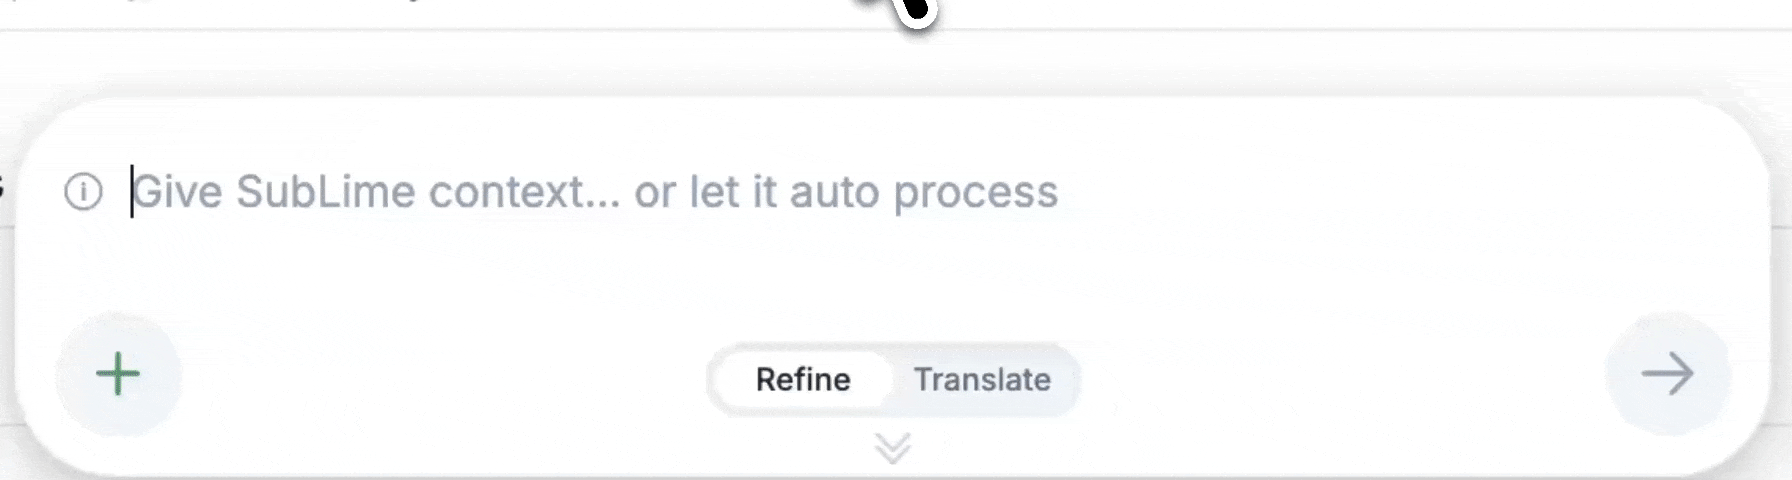
4.2 Plus Button: Integrating Settings Behind a Lightweight Entry Point
On the left side of the input box, there is a plus button.
The design was inspired by the plus button in products like ChatGPT and Gemini.
When users click it, a menu opens with several common processing options, such as:
· Filtering filler words, pauses, stutters, and profanity
· Punctuation settings, including:Keep original punctuationRemove ending punctuationRemove all punctuation
This menu stays collapsed by default, so it does not take up extra space on the interface.
I also added some animations to the plus button:
In the default state, it is a plus icon.
After being clicked, it rotates 45 degrees clockwise and visually becomes a close button.
When subtitles are first loaded, the plus button briefly shows a green breathing effect on both the icon and its shadow, signaling to users that the button is interactive.
These are some small interaction details, but it helps users understand how the menu works.
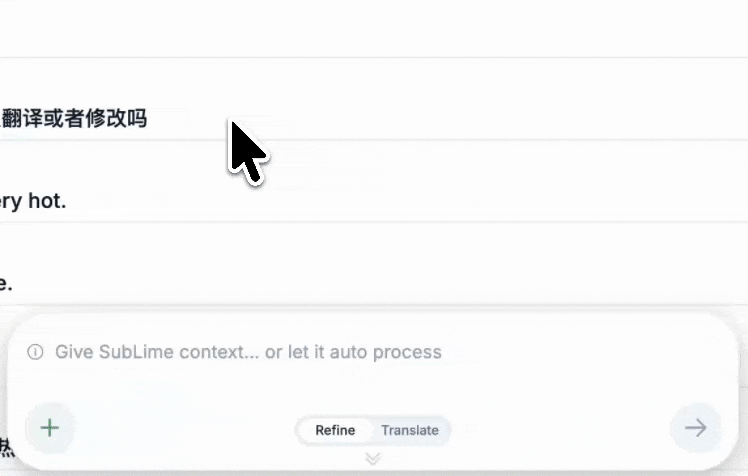
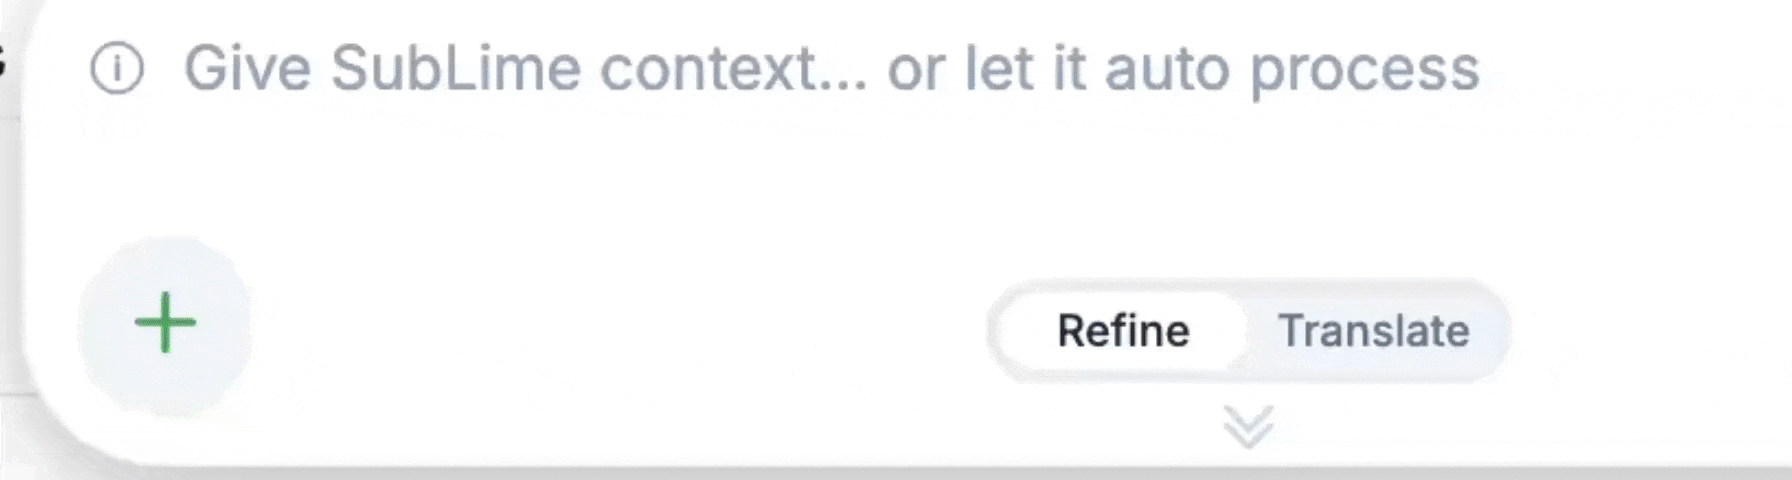
4.3 Custom Instruction Area: Let Users Describe the Task in Their Own Words
The center area is the main text input field.
Users can write any subtitle processing instruction in natural language, including but not limited to:
·Subtitle background information
· Information about people in the video
· Time and location
· Proper nouns
· Custom proofreading requirements
· Custom translation requirements
For example:
This video is about a street interview in New York. “SoHo” refers to the neighborhood in New York, so do not translate it as a person’s name.
Or:
Please remove all “you know” filler words, but keep the speaker’s natural tone.
I also added a hint menu next to the input area.
It tells users what kind of information they can enter, so first-time users do not feel lost.
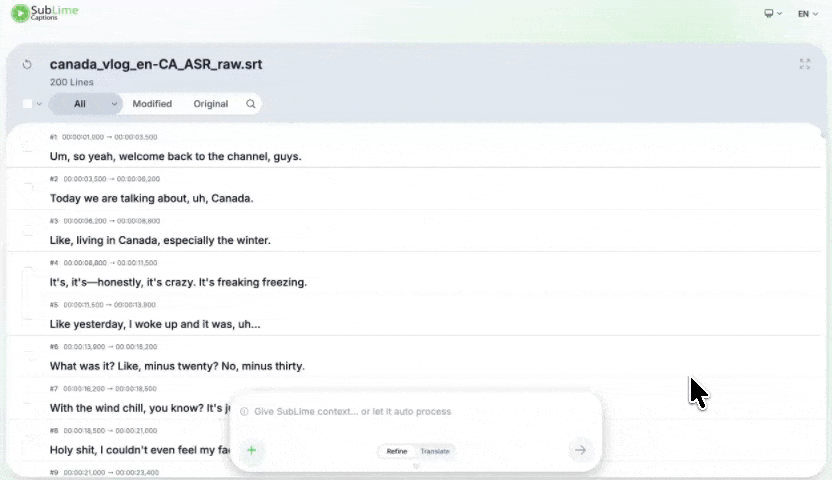
4.4 Send Button: Using Visual Feedback to Show When an Action Is Available
On the right side of the input box, there is a right arrow button.
When users click it, the product sends both the user instruction and the subtitle content to the AI API for processing.
I designed several states for this button.

Unlike most AI tools, entering instructions is optional. Users can process subtitles immediately or provide additional instructions for the AI. The hover state stays the same to show that the button is always ready to be clicked, while the icon color indicates whether custom instructions are present.
4.5 Input Box Visibility Logic: Reducing Obstruction While Keeping It Accessible
On the subtitle processing page, the input box takes up a certain amount of space.
So I designed a visibility logic that combines automatic hiding and manual control.
4.5.1 Auto-Hide: Responding to Subtitle Browsing Behavior
When users scroll through the subtitles:
Scrolling upward hides the input box automatically.
Scrolling downward shows the input box automatically.
This follows a common auto-hide on scroll pattern.
When users scroll down the subtitle list, it usually means they are reading or reviewing the content.
So the bottom instruction box slides out of the screen to create more reading space.
When users scroll back up slightly, it may mean they have finished reading or want to go back and edit something.
At that moment, the input box smoothly appears again.
The goal is to reduce obstruction and give users more space when they are browsing subtitles.
4.5.2 Manual Reveal: Keeping the Hidden Input Box Discoverable
When the input box is hidden, a small upward triangle button appears at the bottom of the subtitle editor.
Users can click it to bring the input box back.
Also, if users select any subtitle line, the hidden input box appears immediately.
This is because selecting a line often means the user may want to perform an action on that specific subtitle, such as:
· Proofreading one line
· Translating one line
· Entering a local instruction for selected subtitles
4.5.3 Manual Hide: Giving More Space for Deep Reading
There is also a collapse button at the bottom of the input box.
If users only want to review subtitles or manually edit them without being blocked by the input box, they can hide it manually.
After manual hiding:
· The input box will not appear automatically when users scroll.
· A manual expand button appears at the bottom.
· The expand button has a breathing animation.
· The button area also shows a soft glow in the theme color.
When users select any subtitle line, this green glow also appears with the same breathing effect.
This design is meant to remind users:
You manually collapsed the input box. If you need it, you can open it here.
4.6 Processing Progress Bar: Making the Task Visible and Interruptible
When users click the send button and start AI proofreading or translation, the whole instruction input box collapses into a progress bar.
The progress bar includes:
On the left: processing percentage and a theme-colored progress bar with a light streak effect
On the right: a stop button
The progress bar uses the theme color and a subtle light streak to show that subtitle processing is currently running.
If users click the stop button, they can interrupt the current operation.
After stopping, the task can continue from where it stopped until all subtitles are processed.
This makes the AI process feel more visible and controllable, instead of leaving users waiting without knowing what is happening.
5. Subtitle Editor Design: Optimizing for Subtitle Files at Any Scale
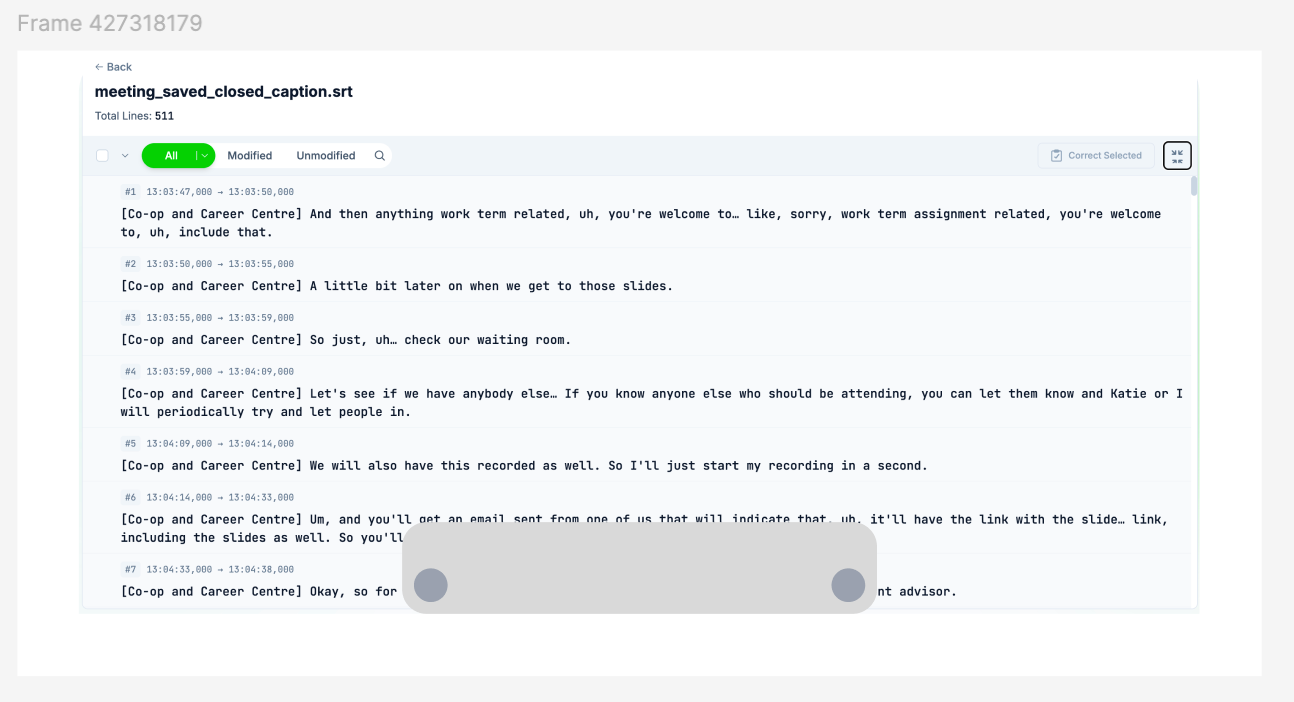
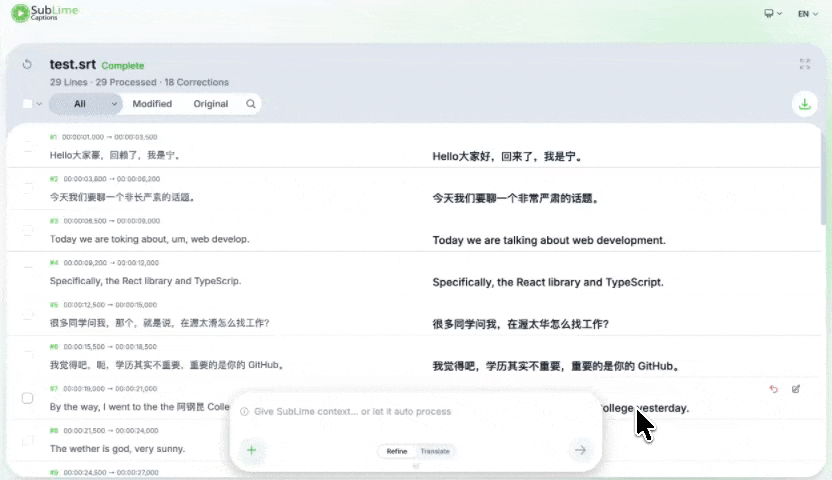
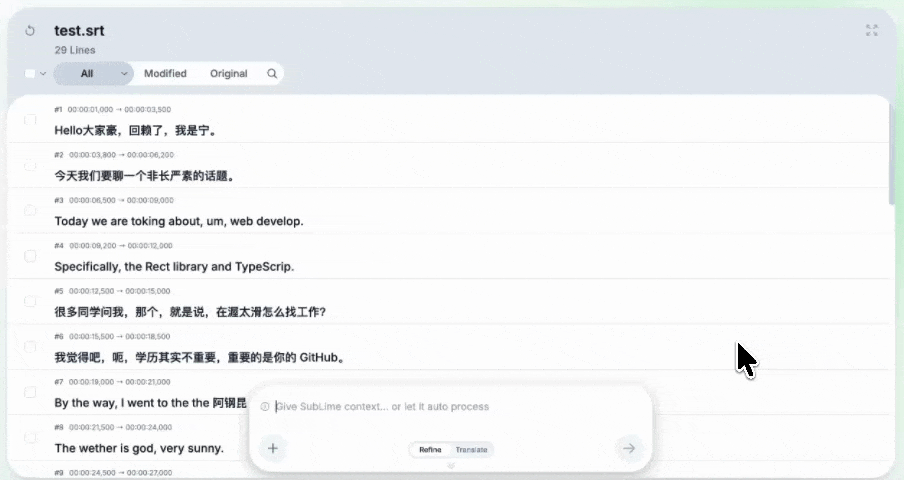
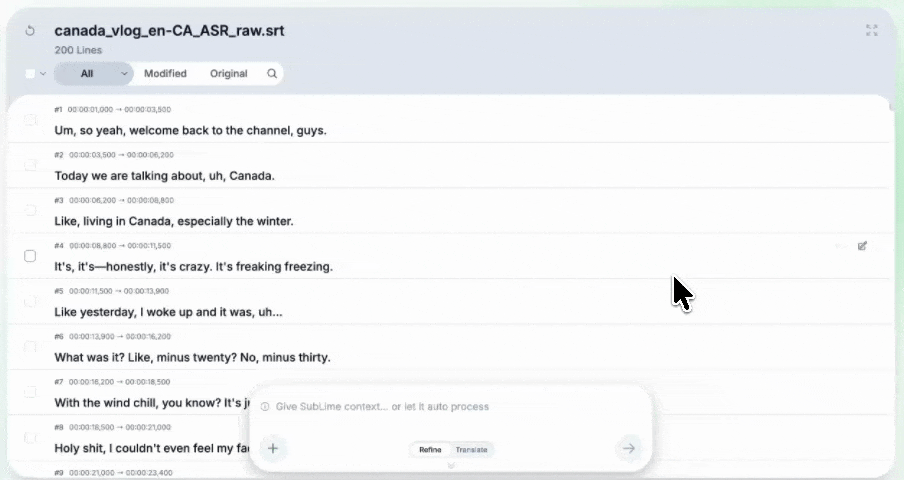
SubLime Captions has a main workspace—the subtitle editor— after a user uploads a subtitle file.
This is where users can preview, select, filter, search, edit, proofread, translate, revert, restore, and finally download the subtitle file.
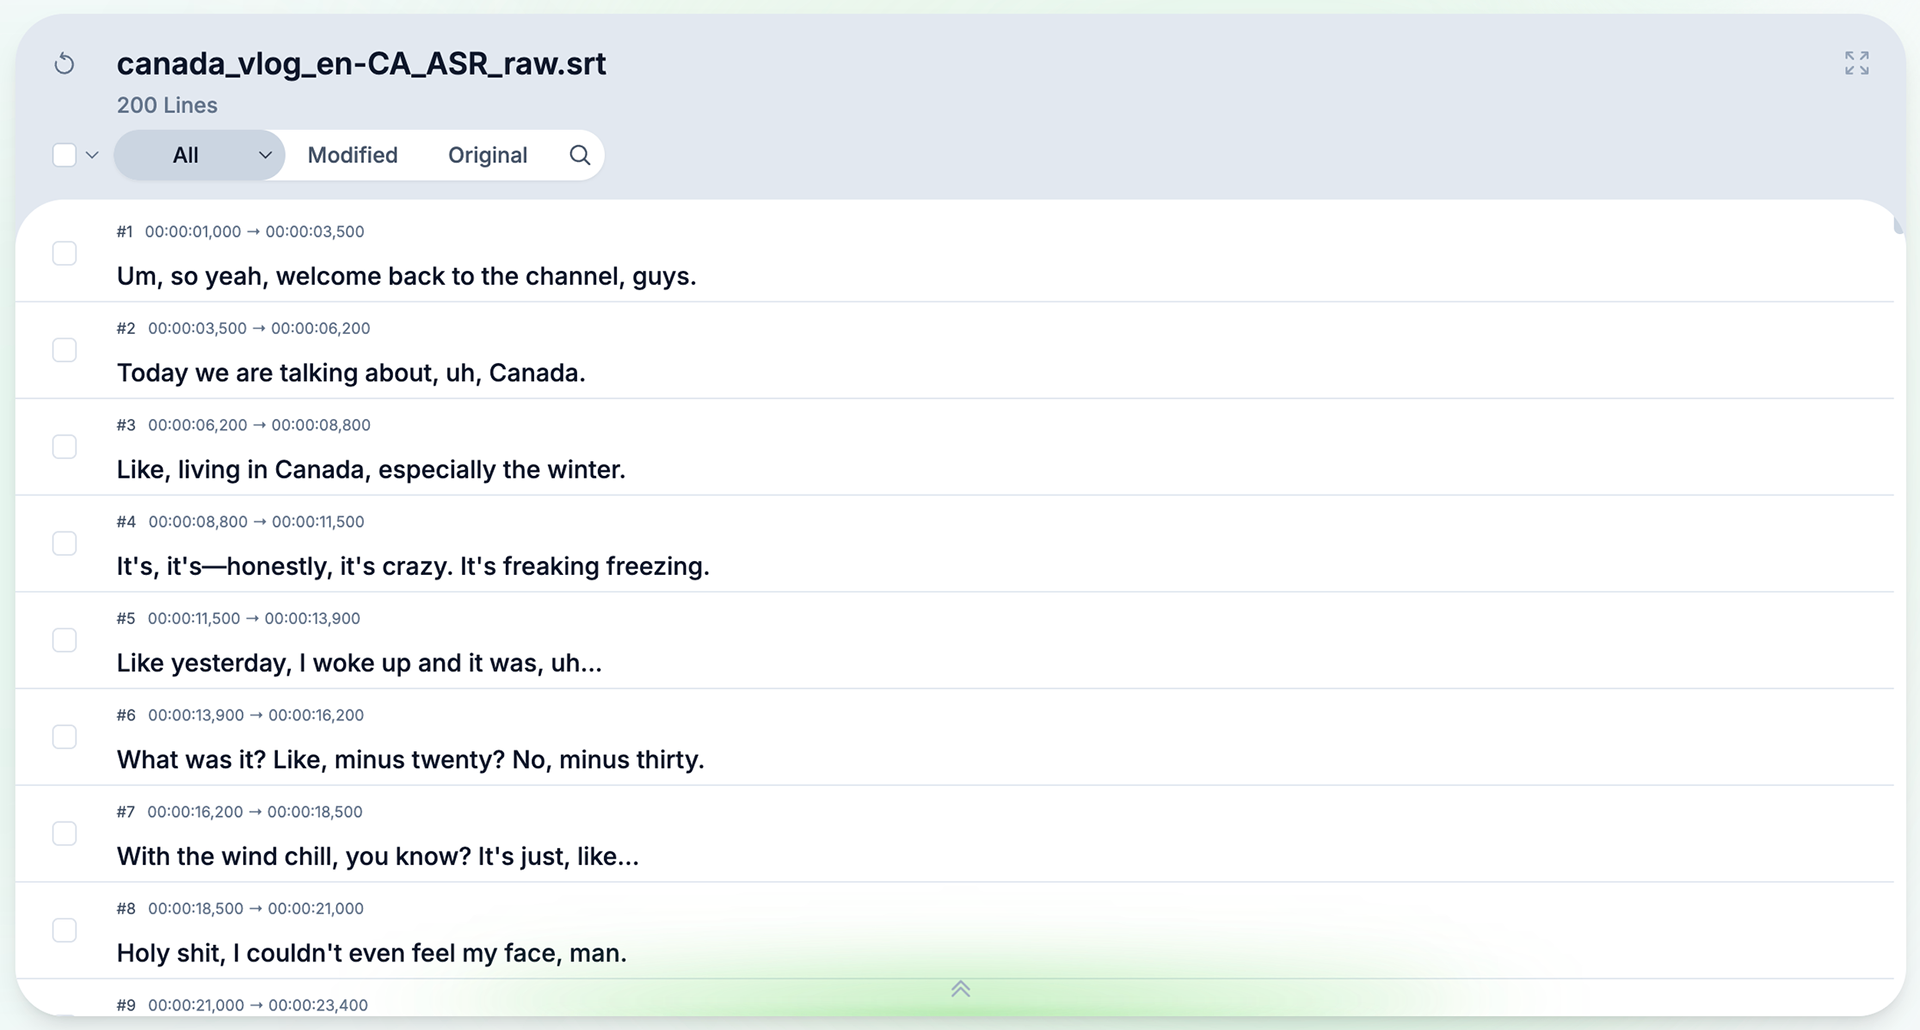
Subtitle files can vary greatly in length, from a few dozen lines to well over a thousand.
The editor was designed to support efficient subtitle processing at any scale. Rather than simply displaying subtitles, it serves as an efficiency tool built around the entire editing workflow.
5.1 Basic Structure: Keeping Subtitle Processing Clear and Focused
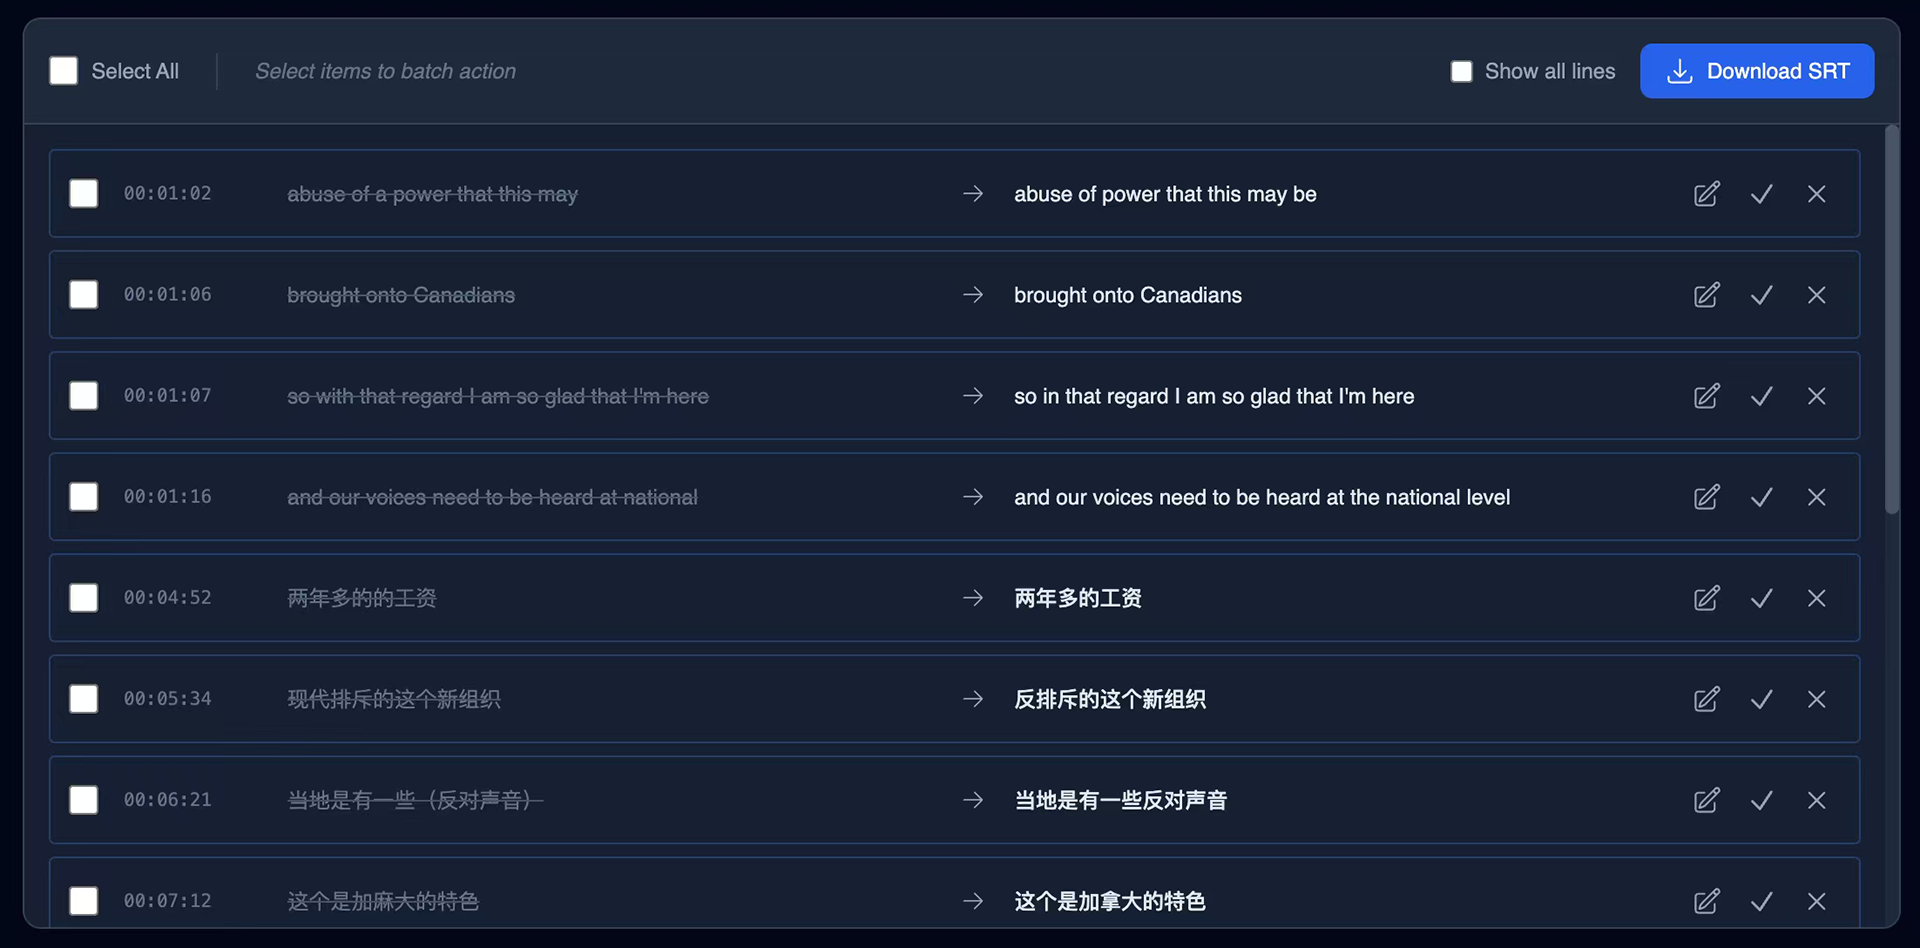
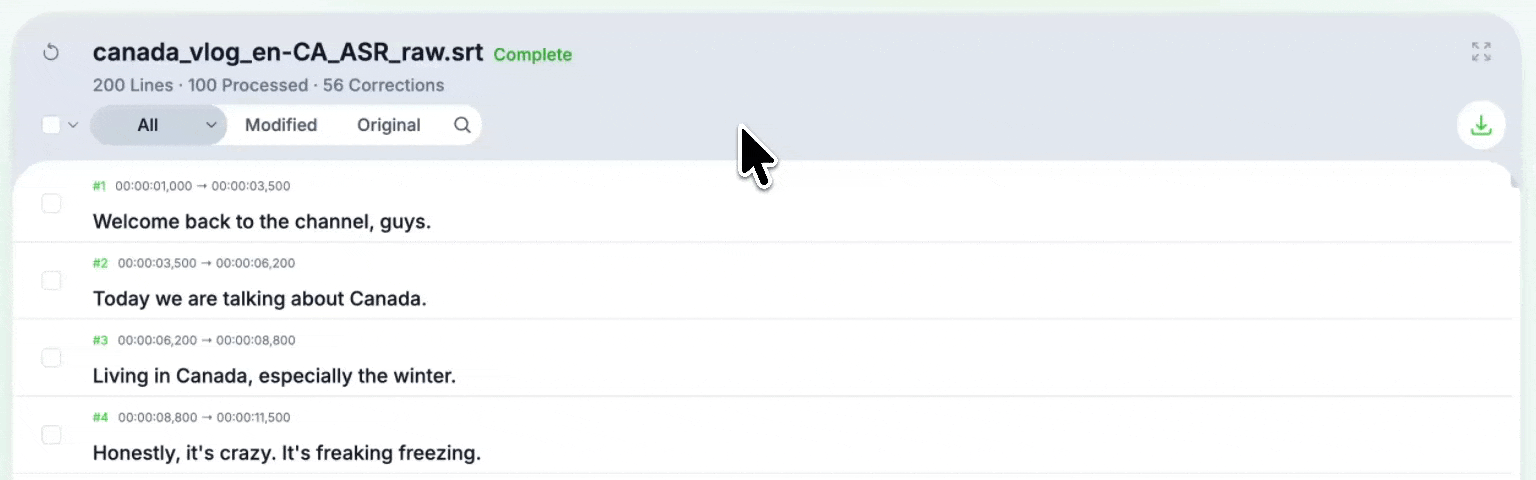
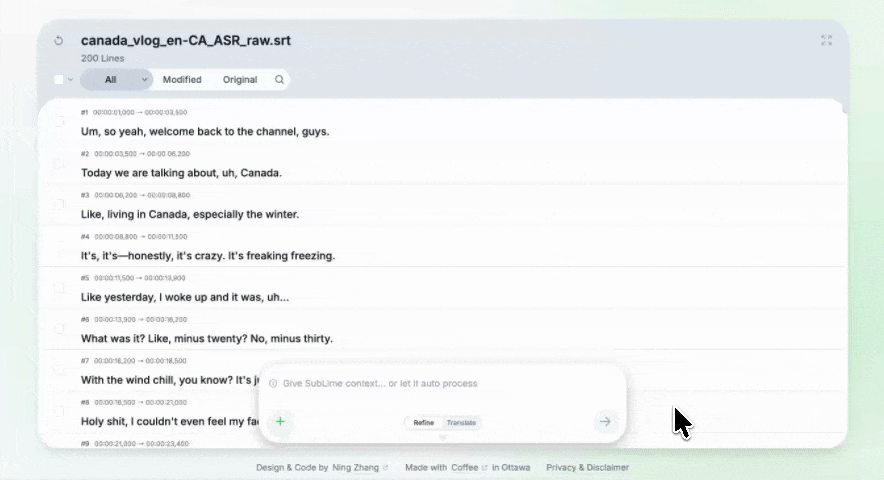
Each subtitle line includes three key parts:
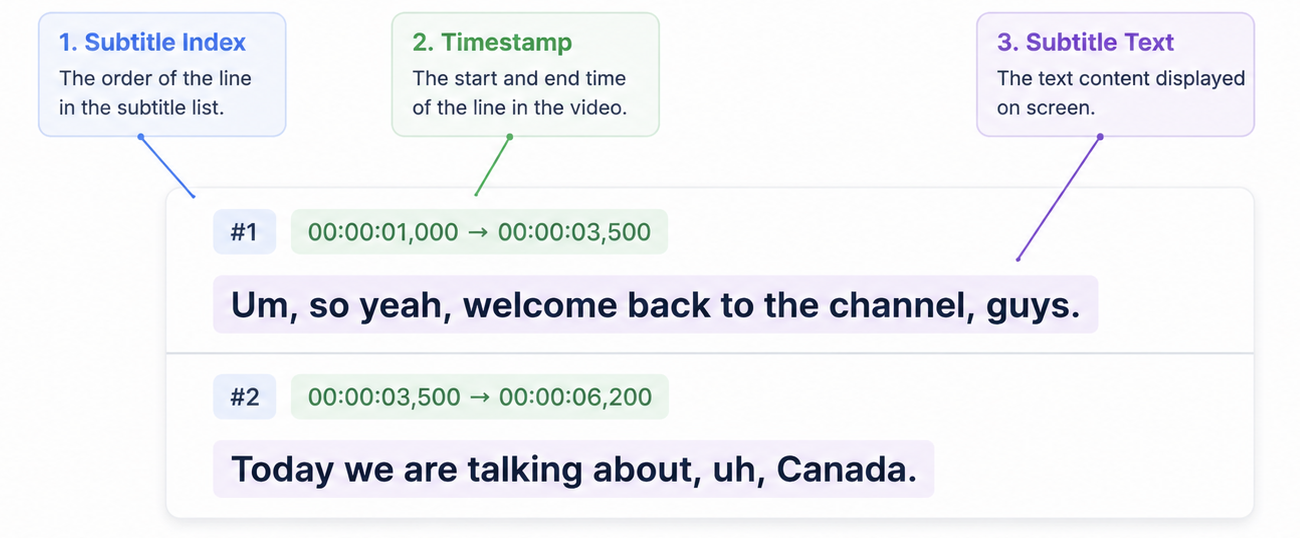
This helps users understand where each line is located in the video.
The subtitle index also serves as a processing status indicator. After a line has been successfully proofread or translated, its index changes to green. If processing fails, the index changes to red, allowing users to quickly identify which subtitle lines may require attention.
At the top of the editor, there is a header area that shows file status and common actions, including:

This design helps users stay oriented, focused, and efficient throughout the subtitle editing process.
5.2 Selection Tools: Making Batch Operations Efficient
Each subtitle line includes a checkbox, allowing users to select one or more lines before applying AI proofreading, AI translation, revert, or restore actions.
To support different workflows, the editor provides several selection methods:
· Single selection
· Drag selection

· Select all
· Invert selection
For long subtitle files, drag selection becomes especially useful. Users can click and drag across the checkbox area to continuously select or deselect multiple lines. If the cursor reaches the edge of the editor, the list automatically scrolls, allowing selection to continue across a much larger range.
These interactions were designed to reduce repetitive clicking and make batch operations more efficient. Whether users are processing a small section or an entire subtitle file with thousands of lines, they can quickly select the content they want to work with.
5.3 Selected Subtitle Capsule
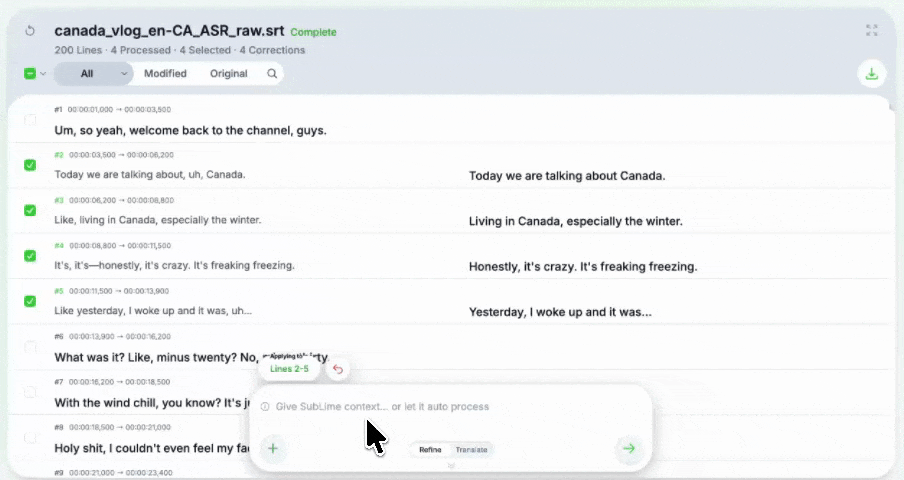
When users select any subtitle line, a capsule button appears above the instruction input box.
It shows the current selected range and reminds users:
The next action will be applied to these selected subtitles.
For example, if the user selects lines 2 to 5, the capsule will show that range.
When the user clicks the capsule, the editor automatically scrolls to each selected subtitle line and brings it to the top of the editor in sequence.
This provides a quick way to review selected subtitles, especially when they are scattered across a long file, without requiring users to manually scroll through the list.

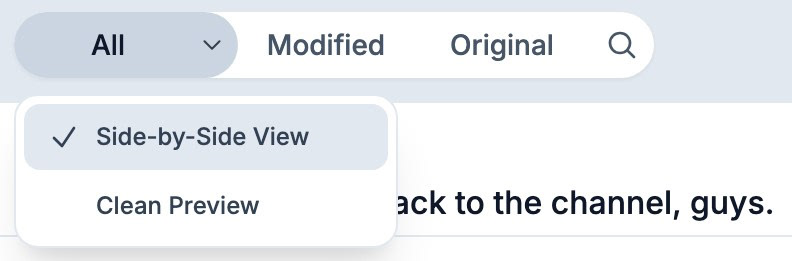
5.4 Filtering, Viewing, and Finding Subtitles
The editor provides several tools to help users quickly focus on the subtitles they want to review.
Users can filter subtitles by processing status, including:
· All
· Modified / Translated
· Original
The labels automatically adapt to the current mode, so the terminology always matches the user's task.
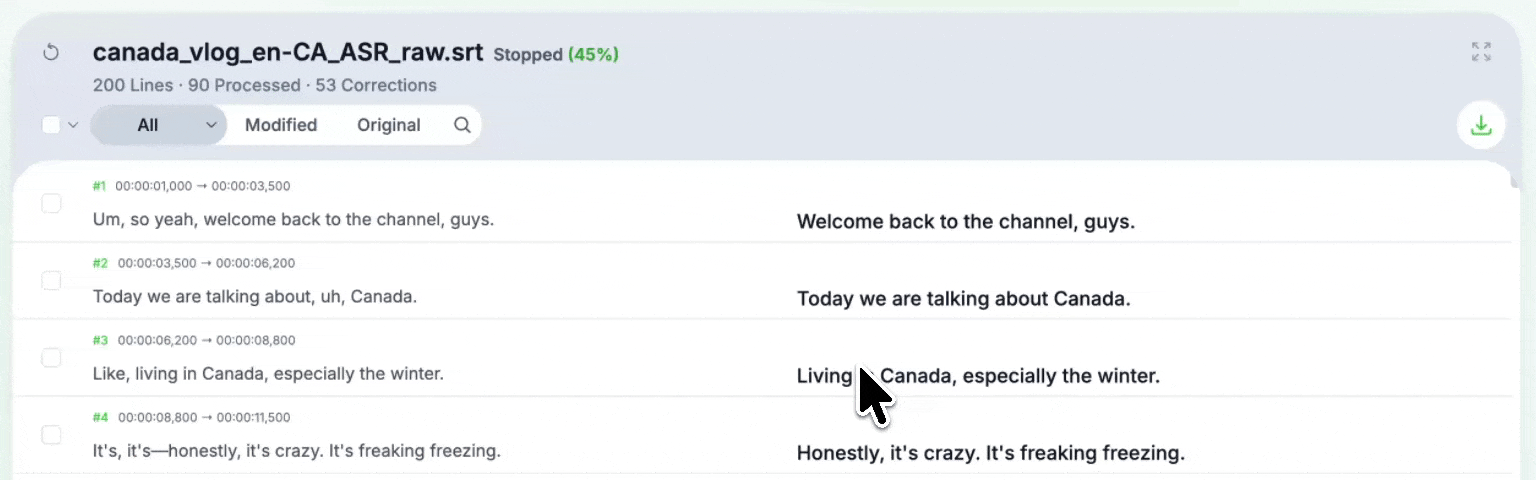
For reviewing results, the editor supports two viewing modes:
· Comparison View, which displays the original subtitle alongside the processed version
· Immersive Preview, which displays only the processed subtitle for final review
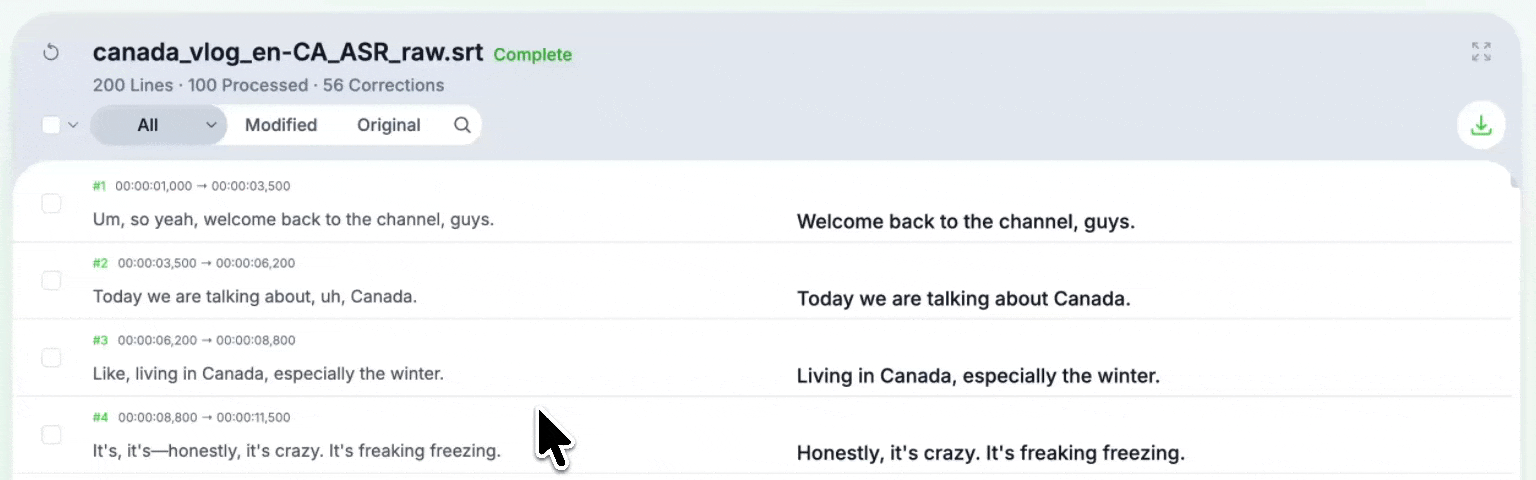
These views support two different goals: checking AI changes and reviewing the final reading experience.
When users select subtitle lines, they can also switch to a Selected View by clicking the "All" button, which displays "Selected" when hovered, to review only the chosen subtitles. This makes it easier to focus on a specific section of the video without distractions from the rest of the file.
For faster navigation, the search bar supports subtitle text, line numbers, and timestamps, allowing users to quickly locate specific content without manually scrolling through the entire subtitle file.
Together, these tools help users spend less time navigating long subtitle files and more time reviewing the content that matters.
5.5 Revert, Restore, and Manual Control
AI-generated changes are never permanent.
Users can revert or restore both individual subtitle lines and selected groups of subtitles, allowing them to quickly compare results and undo unwanted changes. For cases where neither version is ideal, users can manually edit subtitle content directly within the editor.
Potentially destructive actions, such as deleting a subtitle line, are visually separated from common editing actions to help prevent accidental mistakes.
The goal is to give users confidence in using AI while ensuring they always remain in control of the final subtitle output.
5.6 Flexible Workflows and Version Management
One important design decision in SubLime Captions is that users can switch freely between proofreading and translation modes.
For example, users can proofread subtitles first and then translate the corrected version, or translate first and continue refining the results afterward. They can also switch between the two modes multiple times while gradually improving subtitle quality.
To support this flexible workflow, the editor preserves different processing stages. When users have performed multiple rounds of proofreading and translation, the download menu provides access to both the current version and the previous version of the subtitle file.
This allows users to keep different outputs, compare results between processing stages, or return to an earlier version when needed.
The goal is to adapt to different subtitle workflows while giving users full control over how AI-generated results are used and preserved.
5.7 Takeaway: The Subtitle Editor Is an Efficiency Tool
The subtitle editor is not designed just to display subtitles.
Its purpose is to make subtitle proofreading and translation more efficient by helping users quickly find, select, review, edit, and process subtitle content.
An AI subtitle tool should not focus on automation alone. Users still need the ability to review results, make adjustments, and keep control over the final output.
The role of the editor is to combine AI automation with human judgment, making the workflow faster while keeping it flexible and controllable.
6. Homepage, Navigation, and Basic Experience
This chapter covers some basic product experience design, mainly around first-time use, navigation, and accessibility.
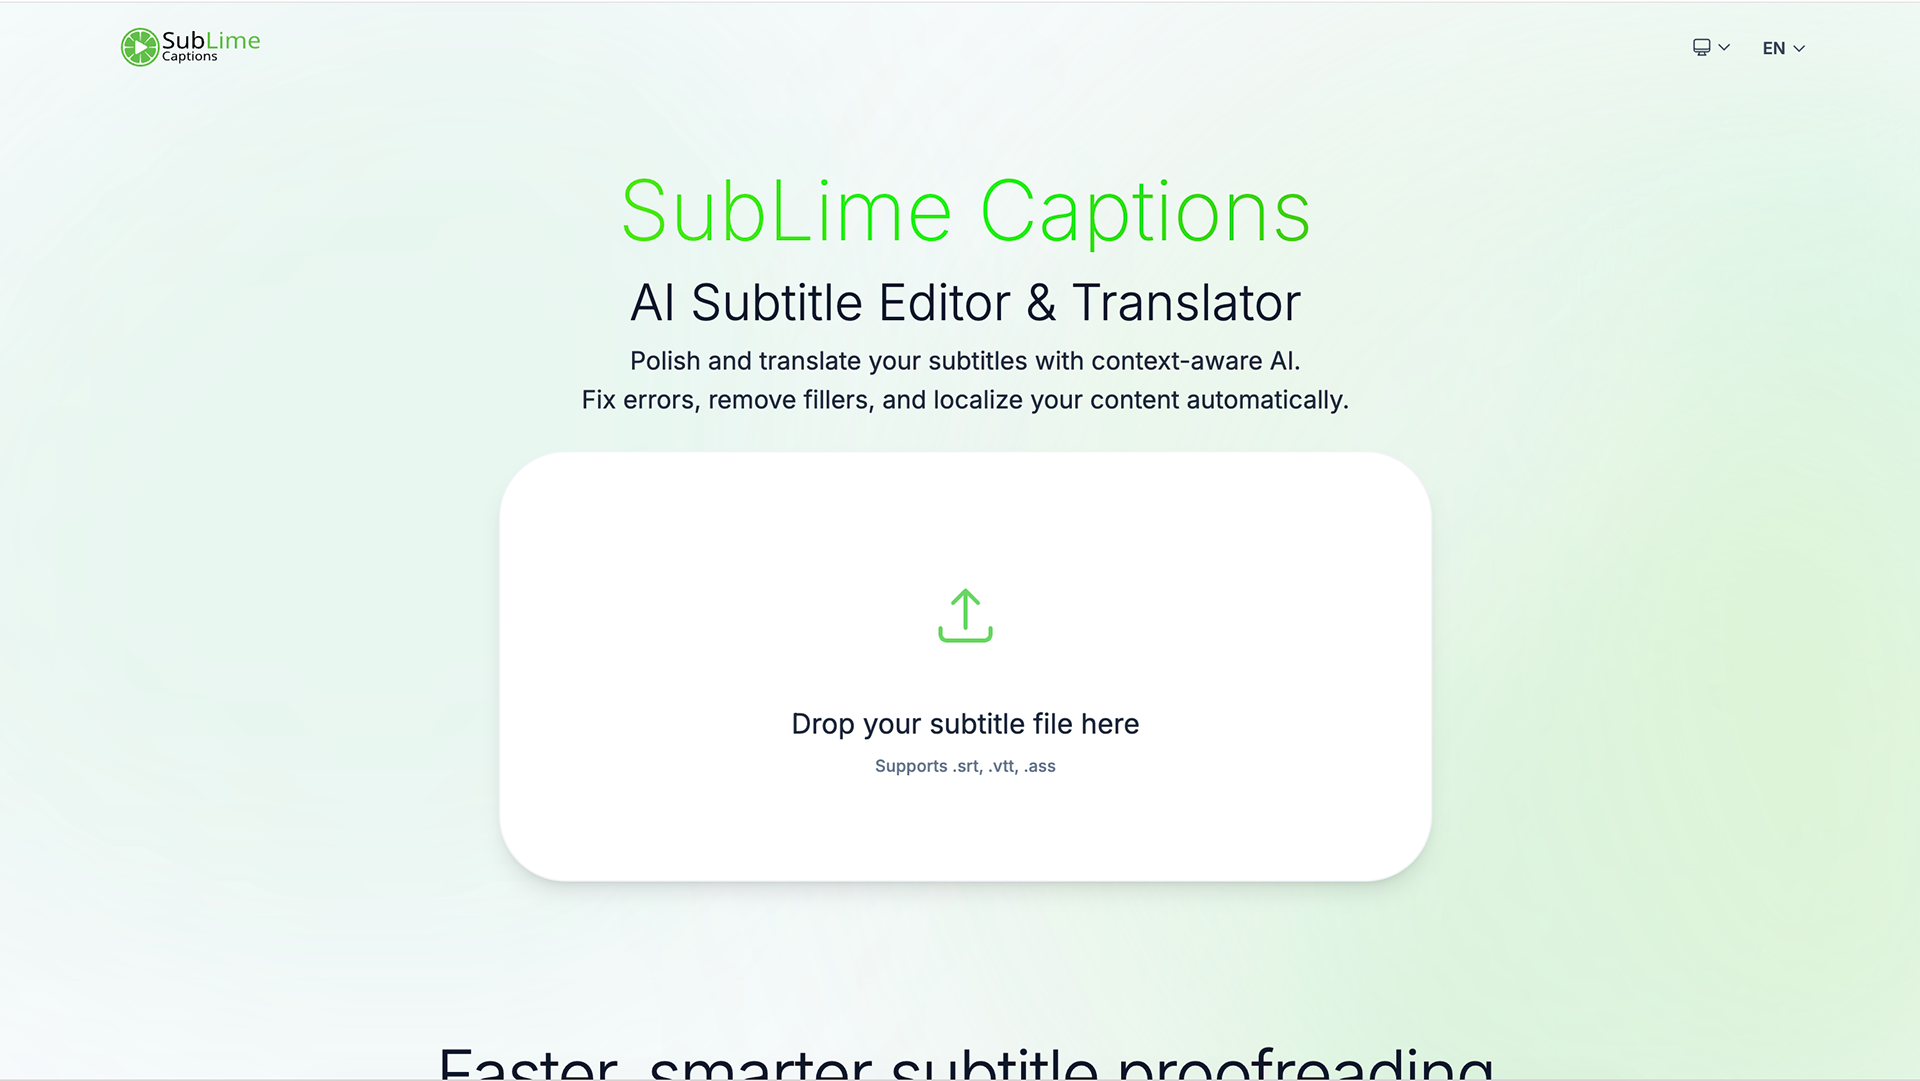
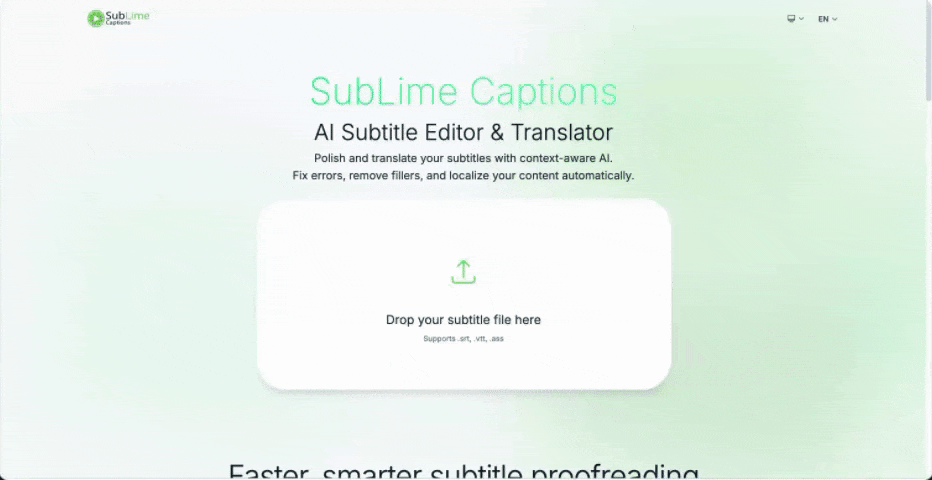
6.1 Homepage Upload Area
The homepage centers on the subtitle upload area.
Users can either click to select a subtitle file or drag and drop the file directly into the upload box.
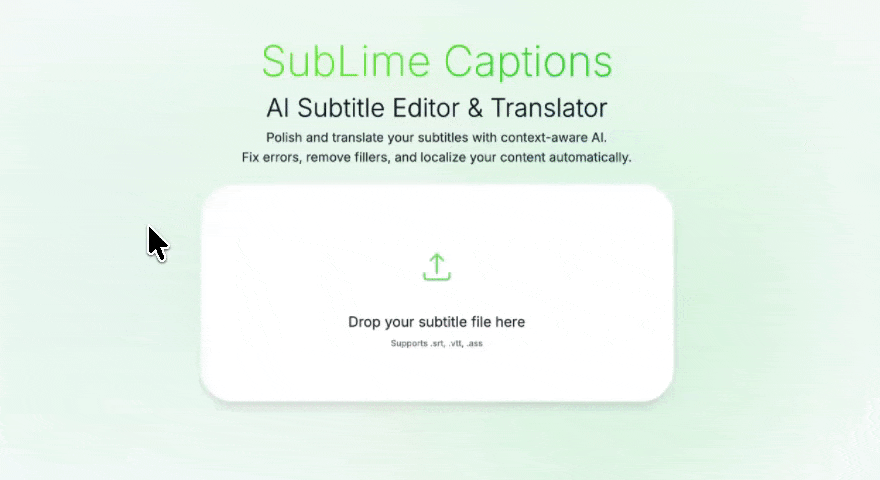
After uploading, the file is loaded into the subtitle editor automatically.
The goal is simple:
Let users start the task as quickly as possible.
6.2 Feature Showcase and FAQ
Below the upload area, I added a lightweight introduction section.
It includes two parts:
· Short video demos for AI-powered subtitle proofreading and subtitle translation
· An FAQ section using an accordion layout
The video demos help new users quickly understand what the product does.
The FAQ section keeps supporting information available without making the homepage feel too long.
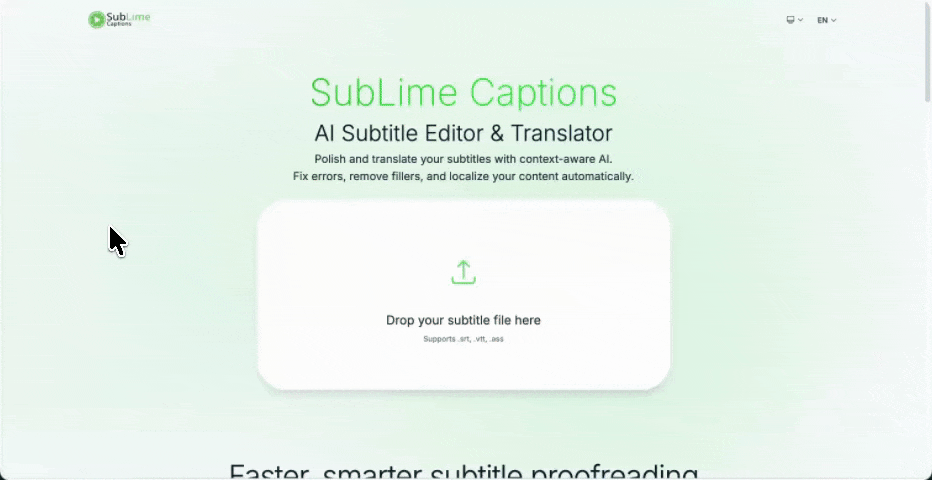
Users can expand a question when they need more information, and collapse it when they do not.
6.3 Navigation Bar
The navigation bar stays lightweight.
The logo on the left takes users back to the homepage and exits the current subtitle task.
On the right side, there are two basic controls:
· Theme switcher
· Language switcher
The theme switcher supports dark mode, which is useful for longer subtitle review sessions or low-light environments.
The language switcher supports four interface languages:
· English
· Simplified Chinese
· Traditional Chinese
· French
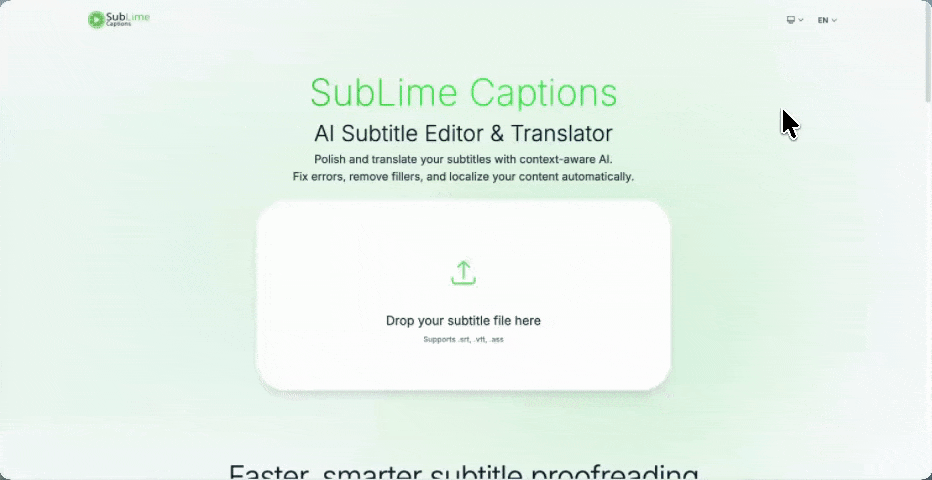
Since this is a subtitle translation tool, multilingual interface support also fits the product’s use case.
7. Brand and Visual System: Using Lime Green as a Recognizable Brand Cue
7.1 Naming: The Double Meaning of “Sub + Lime” and “Sublime”
In the early stage, I explored a few different names for the product.
In the end, I chose SubLime Captions.
The name can be understood in two ways.
Sub + Lime
“Sub” refers to subtitles. “Lime” refers to the lime fruit.
Together, the name connects the product with subtitles, while also creating a clear visual direction.
Sublime
The word “sublime” itself also means something excellent, refined, or elevated.
So for me, SubLime Captions can also mean:
A tool that makes subtitles cleaner, better, and more refined.
7.2 Theme Color: Why Lime Green
Based on the idea of “Lime”, I chose lime green as the main theme color.
The color value is #32CD32.
This color feels:
· Young
· Energetic
· Noticeable
· Light
· Slightly tech-oriented, but not too cold
I also selected several neighboring shades of green to use as accent and gradient colors throughout the interface. This helped create more visual depth while keeping the overall color palette consistent with the Lime theme.
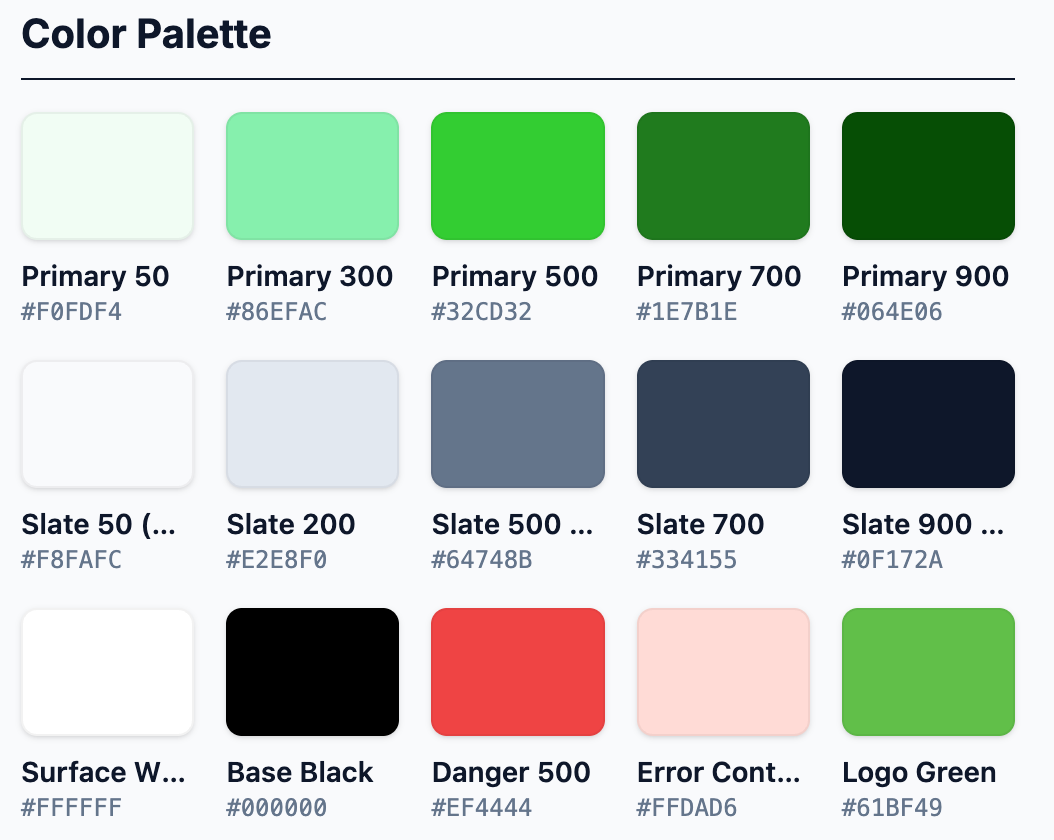
In the UI, I used these colors for key interaction states, such as selected checkboxes, button hover states, and the glowing edge effect around the subtitle editor.
7.3 Logo Design: Connecting Subtitles, Video, and Lime
The logo combines two elements:
· A sliced lime
· A video play triangle
This helps users quickly understand two things:
· The product is related to video
· The visual identity is connected to “Lime”
In the wordmark, the “Lime” part of “SubLime” uses the theme color.
This creates a visual connection between the icon and the text, and also makes the brand easier to remember.
7.4 Visual Details: Reinforcing the Brand Through Key Interactions
The theme color is not only used in the logo.
I also used it in several key interaction moments across the product.
7.4.1 Homepage Title: Using a Light Streak Effect
The main title “SubLime Captions” uses the theme color and similar green tones, with a subtle light streak effect.
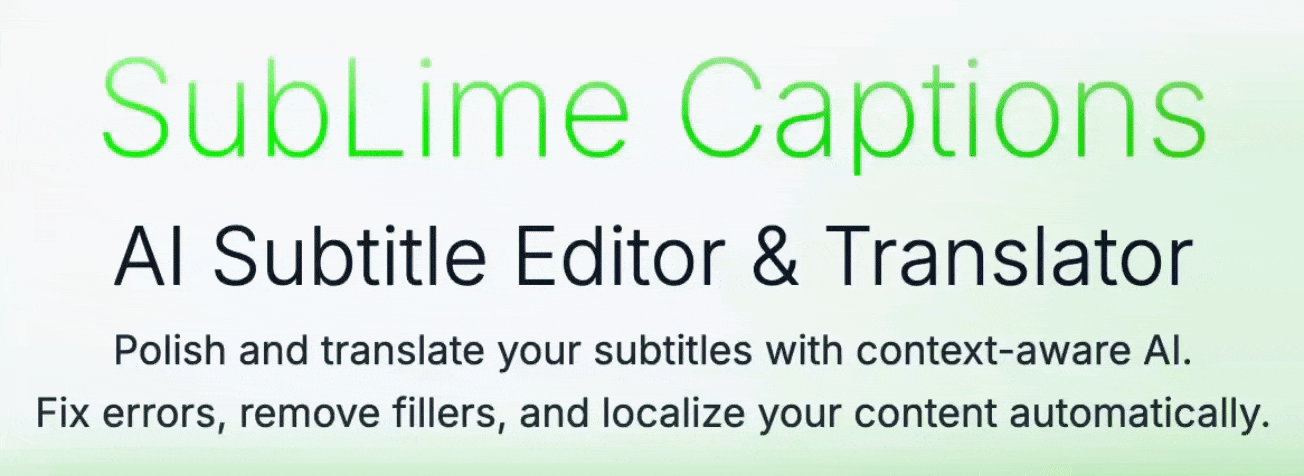
This gives the title a bit more motion and makes it easier to remember.
7.4.2 Upload Box: Making the Main Entry Point Feel Clickable
The subtitle upload box includes a few visual details:
· The upload button uses the theme color
· On hover, the border shows a lime green glow
The glow is soft and slightly blurred, feels like a glass edge being gently lit up
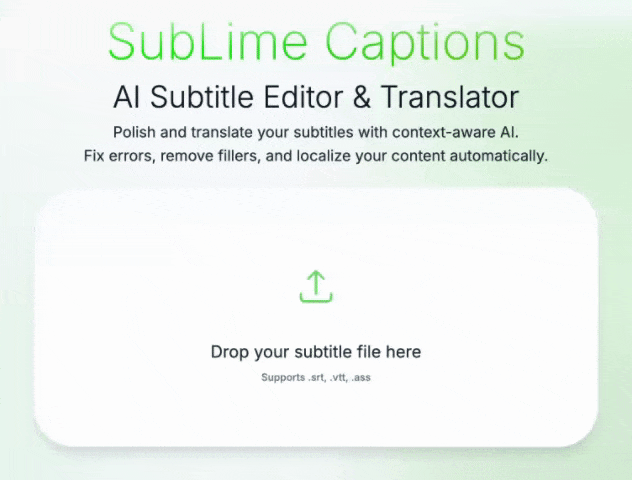
The goal is to make the upload area feel more clickable and make the homepage look less generic.
7.4.3 Processing State: Showing That the System Is Working
When the subtitles are being proofread or translated by AI, the edge of the subtitle editor shows a soft glowing effect.
The glow also has a subtle breathing animation.
Its purpose is to tell users:
The system is processing your subtitles. Please wait.
Compared with a normal loading icon, this feels more consistent with the overall visual style of the product, and also less abrupt.
7.4.4 Website Background: A Light AI Atmosphere
The website background uses soft lime green glows to create a subtle AI-inspired atmosphere without distracting from the subtitle workflow.
The glows are generated randomly, so each page refresh produces a slightly different composition, making the product feel more alive and less like a traditional utility tool.
The goal was simple: create a light creative tool with a hint of AI, rather than a heavy admin-style interface.
8. Design Reflection: Balancing AI Automation and Human Control
Looking back at this project, there are a few design ideas that I think are worth keeping.
8.1 Replace Complex Forms With One AI Instruction Entry
The first demo required users to fill in several separate fields, such as background information, time, location, proper nouns, and processing instructions.
But in real use, this created extra thinking cost.
Later, I merged them into one AI instruction input box.
Users only need to describe what they want in natural language, just like talking to an AI assistant.
This feels lighter and closer to how people already use AI products today.
8.2 Let AI Understand Context
AI can understand natural language, so the product does not need to force users to break everything into structured fields.
For example, a user can simply write:
This interview happened in Paris. The main character is a designer. “Apple” refers to the company, not the fruit.
The AI can understand which part is background, which part is a proper noun, and which part is an instruction.
This makes the workflow simpler for users.
8.3 Keep Users in Control
Although the product uses AI to proofread and translate subtitles, I still wanted users to have final control.
That is why I kept features like manual editing, revert, restore, selected-line processing, filters, and comparison view.
AI is useful, but it is not always correct.
Users need a clear way to review, adjust, and undo AI results before they can trust the tool.
8.4 Design for Long Subtitle Files
A subtitle file can easily have 800 to 1,000 lines.
In this kind of workflow, small efficiency details matter.
Batch selection, drag selection, search, filtering, and before-and-after comparison are not complicated features, but they can save a lot of time when users are working with long files.
For me, the subtitle editor is not just a place to display subtitles.
It is an efficiency tool.
8.5 Make System Status Clear, but Not Distracting
I used visual feedback such as progress bars, hover states, light streaks, and soft breathing glows to show when the system is working.
But I tried to keep these effects restrained.
Users still need to read and edit subtitles carefully, so the interface should not compete with the content.
The visual system should support the workflow, not interrupt it.
Project Summary: From Automation to a Controllable AI Workflow
SubLime Captions started as a quick demo built with Google AI Studio.
After testing it with real subtitle files, I found that it could solve a real pain point for video creators.
The main work after that was turning a usable demo into a more complete product experience.
The core value of the project is:
Use AI to reduce repetitive manual work, while keeping users in control of the final subtitle content.
For video creators, the goal is to make subtitle proofreading and translation faster, clearer, and more manageable.
That was the original reason I wanted to build SubLime Captions.